1. Vaultwarden
Vaultwarden is a Free password manager with no features hidden behind a paywall. It is basically the self hosted version of Bitwarden which is open source as well. After having created a Vaultwarden vault you can use the Bitwarden extensions and apps to use your self hosted password manager. What is also neat is that it allows for emergency access. In case of need trusted contacts can access your vault after a certain cool down period you set.
- E2EE: Yes
- Authentication: Password, 2FA
- Website: vaultwarden.com
- Repository: Github
- Installation Documentation: Docker Deployment
- Installation Videos: Jim's Garage, Tony Teaches Tech
- Updates: Automatic by using the latest tag
- 1. Installation
- 2. Admin Page
- 3. How to use it ?
- 4. Bitwarden App & 2FA
- 3. Emergency Contacts
- 3. Vaultwarden Configuration
1. Installation
Alright! So your first app or not ;) Anyways we will install Bitwarden that will be used to store all your credentials for your shapps, accounts, identity, bank accounts and what not.
Note! It is assumed that you already own a domain name e.g vw.example.org that you will use for your instance. If you have not done that yet then please check out here how we we setup domain names and use a reverse proxy (Caddy) to connect it to your apps.
If that is organized then we can deploy the docker compose file that can be found on their repository page.
- Open your favorite docker container dashboard e.g Arcane
- Copy paste in the compose file that can be found below
compose.yml
services:
  vaultwarden:
    image: vaultwarden/server:latest
    container_name: vaultwarden
    restart: unless-stopped
    environment:
     - PUID=1000
     - PGID=1000
     - ADMIN_TOKEN=your_secure_token_here
     - DOMAIN=https://vw.example.org
     - SMTP_HOST=smtp.example.org
     - SMTP_FROM=mail(at)email.org
     - SMTP_PORT=587
     - SMTP_SECURITY=starttls
     - SMTP_USERNAME=mail(at)email.org
     - SMTP_PASSWORD=smtppassword
    volumes:
      - ./vw-data/:/data/
    ports:
      - 1001:80
3. Now, you could normally leave the file as is but for 2FA it is recommended to setup SMTP Email on your instance as well s.t it can send confirmation emails and emergency contact setups.
- SMTP Email setup
- User and Group variables
- Admin Token for administration access: Create a token with
openssl rand -base64 324. Also note the port number, which I recommend to be the next available open port from your starting port. Recommendation is to start with 1000 and then go upwards by 1 i.e 1001, 1002, etcetera.
5. If all good then you can deploy the project
In the next section we will use the admin token created to generate an Argon token ->
2. Admin Page
Installation Source: Github
On this page we explain how you can setup your Vaultwarden Admin Page s.t you can control your instance, who can and cannot sign up for you instance and many other features.
1. SSH into your docker vm and use the following command to generate an argon hash
docker run --rm -it vaultwarden/server /vaultwarden hash2. Then the output should be like this
Generate an Argon2id PHC string using the 'bitwarden' preset:

Password:
3. Then provide it with the strong password you created with
openssl rand -base64 324. After you have confirmed the password you should obtain a argon hash that looks like this
'$argon2id$v=19$m=65540,t=3,p=4$Qh4dxVxAdfgjoerkfsdfjksldjfoiwef+sdfkojflksjdfoiwejfksjdofijwioejfiosjdoifjwoiefjiosf'5. Then this is the token that you fill in for your VAULTWARDEN_ADMIN_TOKEN inside of the .env file
6. Perfect! Now you can start logging in to the Admin page with your password you created at step 3 and make sure to save this password also in your Bitwarden account since that is the one you need to log in.
7. You can find your admin page at https://vw.example.org/admin
3. How to use it ?
After you have created your Vaultwarden instance it is time to use it and start creating accounts. In this small tutorial we will describe the process of how a friend or family member can create an account and how it can be used with the Bitwarden extensions and applications. If you want to invite a friend or family member to join your server then you can do so in two ways.
- SignUp Page: The first one is to let them go to your instance website e.g vw.example.org and let them sign up for an account. Now, this is an easy method but this also means that you need to have sign up on. This is of course a security risk even though it is not that big if only your friends know about it
- Invitation Links: The second method is to go into your admin page and create invitation links for your friends that only they can openn. Simply go to your admin page -> users -> then at the bottom there is an option to send an invitation link.
Hence, if you don't want to run a public instance it is best to leave sign ups off and only send invitation links to your friends and family.
Turn off Sign Ups
To turn off sign ups you should go login in your admin page and take the following steps
- Go to Settings -> General Settings
- Toggle off Allow new Signups (it is in yellow ;))
Sweet! now only people can sign up for your vault if they receive an invitation link from you via the admin panel
After they have created an account they can start using these credentials for logging in to all Bitwarden applications on all devices. The only thing they need to make sure of is that they select your self hosted server when they want to log in.
Vaultwarden Folders
First of all it is recommended to create separate folders for different types of credentials. You can of course choose whatever you want but a basic structure could be as follows
- Shapps: A folder for all your self hosted apps either hosted by your or by one of friends/family members
- Home lab: If you have a homelab then you can store all your network equipment, proxmox, nas and other infrastructure credentials in here
- Personal: For all your personal accounts i.e Identity, Passports, Licenses, etcetera
- Bank Accounts: Well pretty self explanatory
- Backupfriends: Credentials you keep track of for family members or friends, but also credentials you use to login to a backup server of one of your friends
- Accounts: This is a general account folder for all accounts on third party apps that are not self hosted or hosted by one of your friends.
New Entries
Now, if you create a new entry inside Bitwarden it is recommended to do this in the following way for accounts
- Create a new Bitwarden Entry
- Select the right folder
- Give it a proper name i.e remove the website or app link as a Name for the entry
- In the case of accounts that work in the web browser as on your phone/tablet etcetera make sure you add all the different links to your entry. For android apps this is always androidapp:// followed by the app link. In this way your credentials will always show up instead of that you need to search for them in Bitwarden.
4. Bitwarden App & 2FA
Now, your Vaultwarden is only as safe as the difficulty of your master password. If you choose an easy password to enter your Vaultwarden account then it is still extremely vulnerable for attacks and getting access to all your credentials. Don't fall for this trap even if it might seem convenient since you cannot remember a randomly generated password.
2FA with Bitwarden Phone App
There are however alternatives, which are secure, such as 2FA by using the Bitwarden app on your phone.
Note! It is assumed that you have already created a random password of let's say 20 characters and wrote it down on a piece of paper that is stored away safely
- Download the Bitwarden app to your phone
- Open the Bitwarden app and make sure that you select your Vaultwarder server instance.
- To do this click on logging in or: bitwarden.com
- Then select self hosted
- Provide the Vaultwarden server URL and hit save
- Then go to Settings > Account security
- Then select Unlock with Biometrics
Sweet! now you can always unlock your Bitwarden app on your phone by using your fingerprint.
- Now, we would like that you can use this feature as well for logging in on your laptops inside a Web browser.
- Well, there is an automatic feature in the Bitwarden add on that allows you to Log Out on a browser restart. Unfortunately the Biometrics log in does not work with being locked only. But this is not a big deal for now
- To do this go to Settings > Account Security > and choose the time out action to be Log Out
- Now, when you log out there will be a pop up window for you to allow to open your web browser account with "Login with device"
- Select this and move over to your phone
- On your Bitwarden app login with you biometrics
- Go to Settings > Account Security > Pending Login Requests > Then select your device and approve the device
Perfect! Now you are logged in with 2FA and you can keep logging in easily with a complicated password.
3. Emergency Contacts
Source: Emergency contacts
Hopefully it will never happen but in the case something bad happens to you then it would be great that your loved ones can have access to your passwords s.t they can retrieve your digital life. It must be noted that it will provide access to all your folders and passwords. It does not allow access to only specific folders. So if that is something that you want i.e leave a legacy ;) behind then this is what you do
Note! Your emergency contact does need to have a Vaultwarden account on your instance
1. Enter your Vaultwarden account
2. Go to Settings > Emergency access
3. Add a new emergency contact by clicking on Add emergency contact
4. Type in the email your emergency contact has associated with their Vaultwarden account
5. So how does this work ? well once you setup an emergency contact that emergency contact can request you to have access to your vault. Then it is up to you if you approve or deny that request. However, if you are not available anymore for any reason to respond to this request then it would be useless. Therefore, you choose a Wait time. This wait time is the time after the emergency request that the credentials will be given to the emergency contact automatically. If for instance the wait time is 7 days then 7 days after the request your emergency contact will have access to your vault.
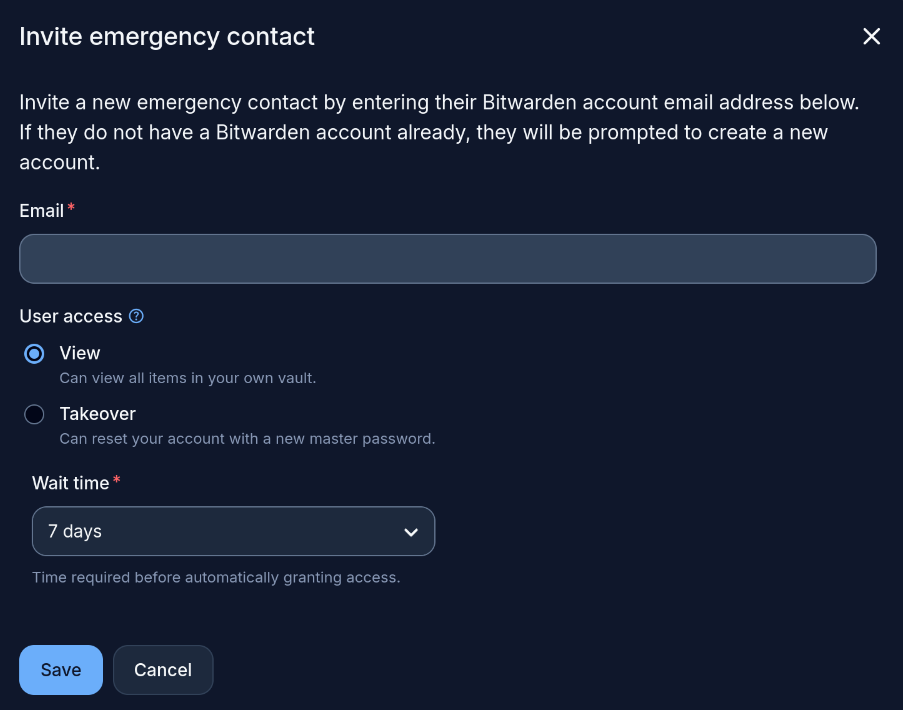
5. After saving an email will be send to the emergency contact that needs to confirm it
6. Once confirmed you will also get an email that your emergency contact approves your request.
7. That's it awesome ! all done ; )
3. Vaultwarden Configuration
After installing Vaultwarden and setting up your domain name pointing towards the docker vm with the right port number it is ready to configure you Bitwarden Account.