2. WAN Setup
In this chapter we will discuss the different ways you can setup a WAN connection or also known as how will your OPNSense router connect to the internet ;) We will discuss DCHP, PPPoE, dynamic, static and multiple WAN connections. So go ahead, check your WAN connection type --> Go to the right page --> get yourself connected to the internet. It is assumed you have already done the local setup s.t you are ready to make a WAN connection.
- 1. Dynamic DHCP WAN uplink
- 2. Static DHCP WAN Uplink
- 3. Dynamic DHCP PPPoE WAN Uplink
- 4. Static PPPoE WAN Uplink
- 5. Private DCHP WAN Uplink
- 6. IPv4 CGNAT Setup
1. Dynamic DHCP WAN uplink
On this page we discuss how to connect your OPNSense router to the internet when you have a dynamic DHCP connection.
2. Static DHCP WAN Uplink
3. Dynamic DHCP PPPoE WAN Uplink
4. Static PPPoE WAN Uplink
Perfect, so you have obtained a set of static IP addresses from your ISP (Hopefully Deternet ISP ;)) and they have told you that you will have a Fiber PPPoE connection. This could be a /30 a /29 or bigger subnet, but the configuration will be the same for all of them. Now, in principle there are two ways your ISP could hand you over a set of static IPv4 addresses. Basically one static subnet or two static subnets
One Static Subnet Configuration
In the case of your ISP only handing you one subnet the following steps should be followed to get your static PPPoE connection up and running.
1. First check if your ISP requires you to be on a specific VLAN to make use of the PPPoE connection.
2. If that's the case then you should first setup a VLAN for your PPPoE connection. If this is not the case then you can skip the following steps and move directly to point 8.
3. To setup an ISP VLAN for your subnet go to Interfaces > Devices > VLAN > + Add
4. Here you first give it a Device name. This should be "vlan" followed with the vlan tag your ISP has provided you
5. Then choose the Parent interface you have the ISP fiber cable or Ethernet cable (with ISP router pass through) connected to
6. Give it the right VLAN Tag the ISP provided you
7. Finally give it a Description i.e name. Personally I like to call it ISPNAME_PPPoE_1. (In my case that is KPN) But it is up to you. If all is good it should look something like this
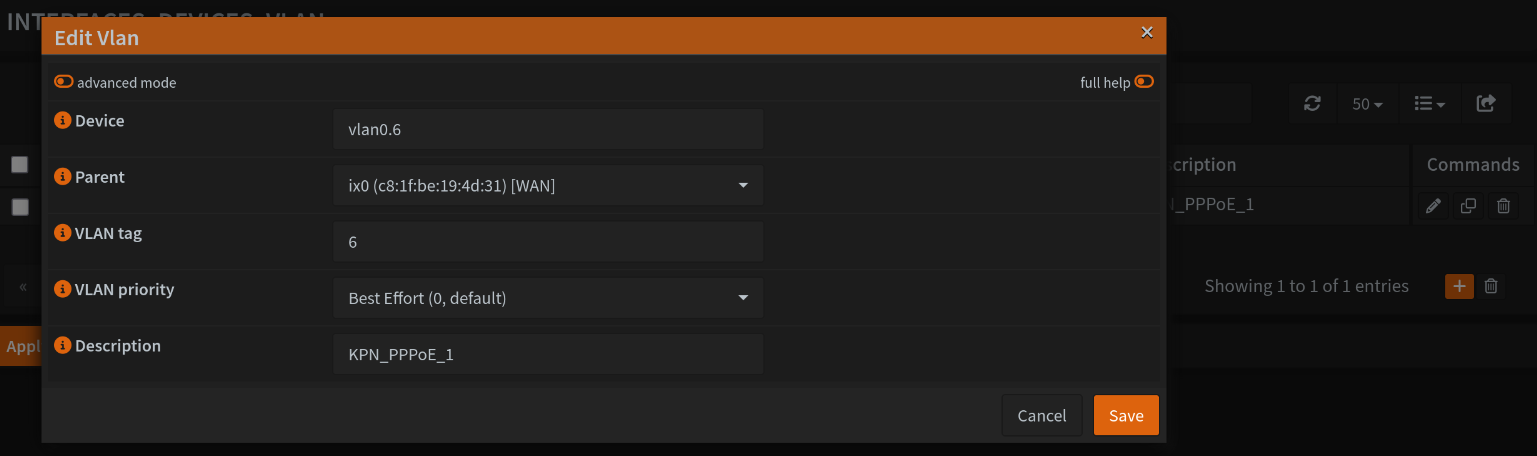
8. Sweet now we can focus on the Point to point connection by going to Interfaces -> Devices -> Point to Point -> + Add
9. Then you can choose what kind of point to point connection you have i.e one cable directly from your home/building to the nearest POP in your neighborhood or even straight to the ISP's datacenter is possible as well.
10. Then we need to Link the interface. In the case with VLAN you choose the vlan0.6 (in my case this is vlan0.6 but yours could be vlan0.99 for instance depending on your ISP) option and otherwise the physical interface name the ISP cable is connected to.
11. Then fill in the subnet at local IP (vlan0.6) you obtained from your ISP
12. Then if all is good it should look something like this (note that the IP address is randomly chosen here, but you should fill in your ISP static IPv4 subnet credentials here)
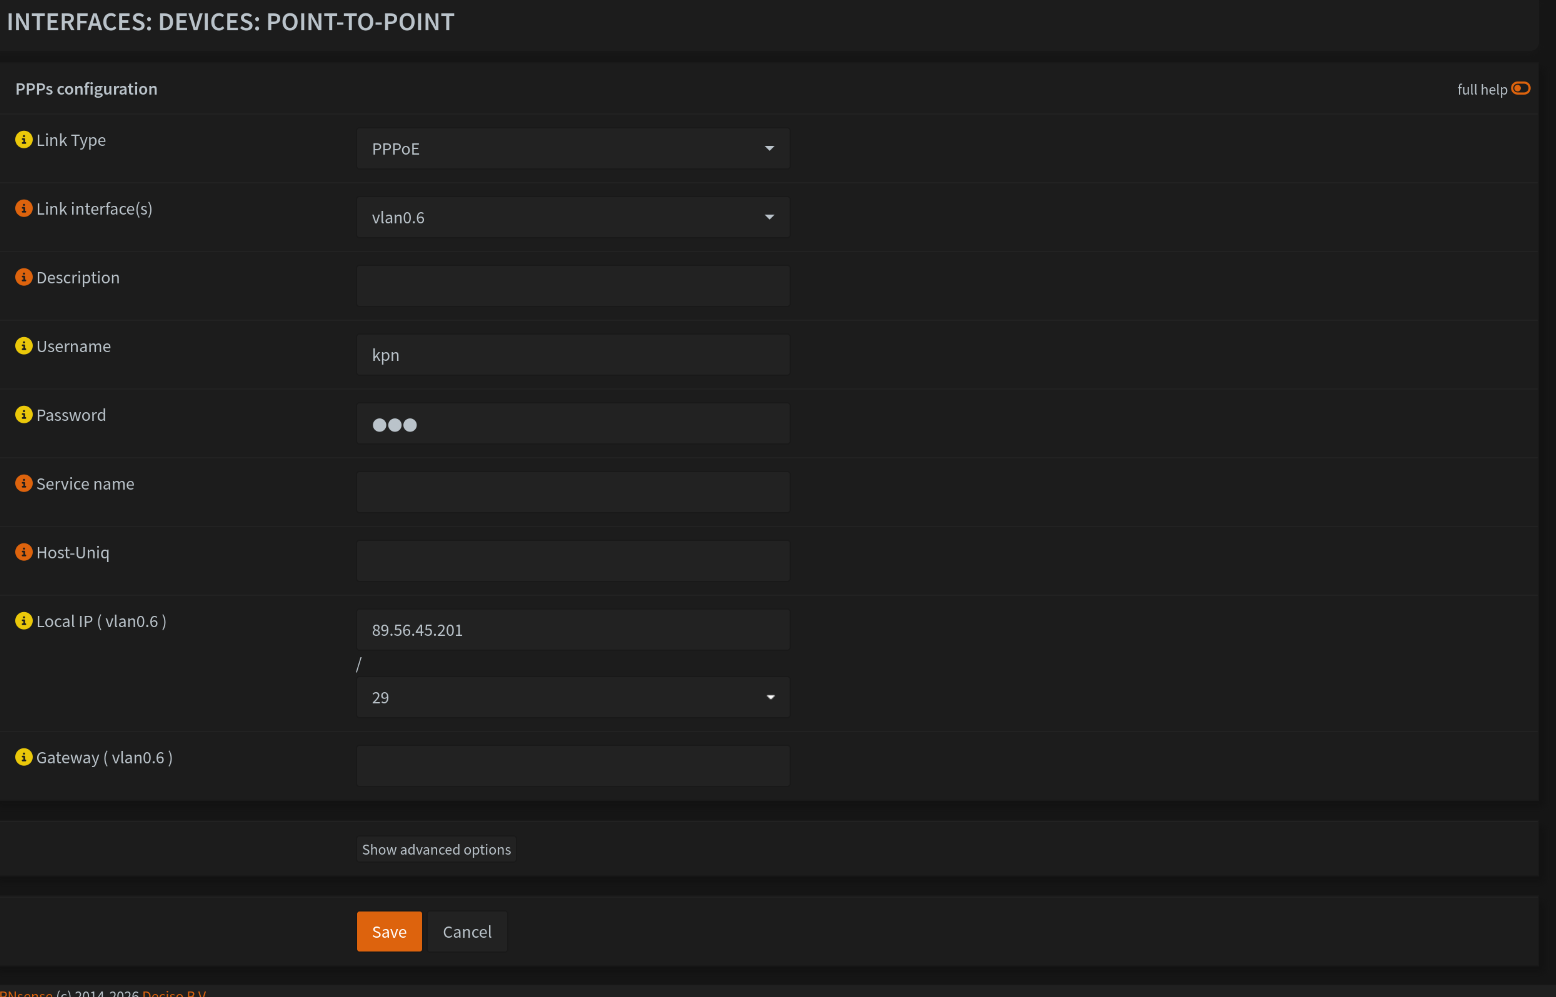
12. Then simply hit Save!!!! almost getting there.
13. Okey we will now go to Interfaces > Assignments > Device drop down menu. Now an option with pppoe0 should pop up. Don't worry if it still red (inactive) that's because we still need to activate it.
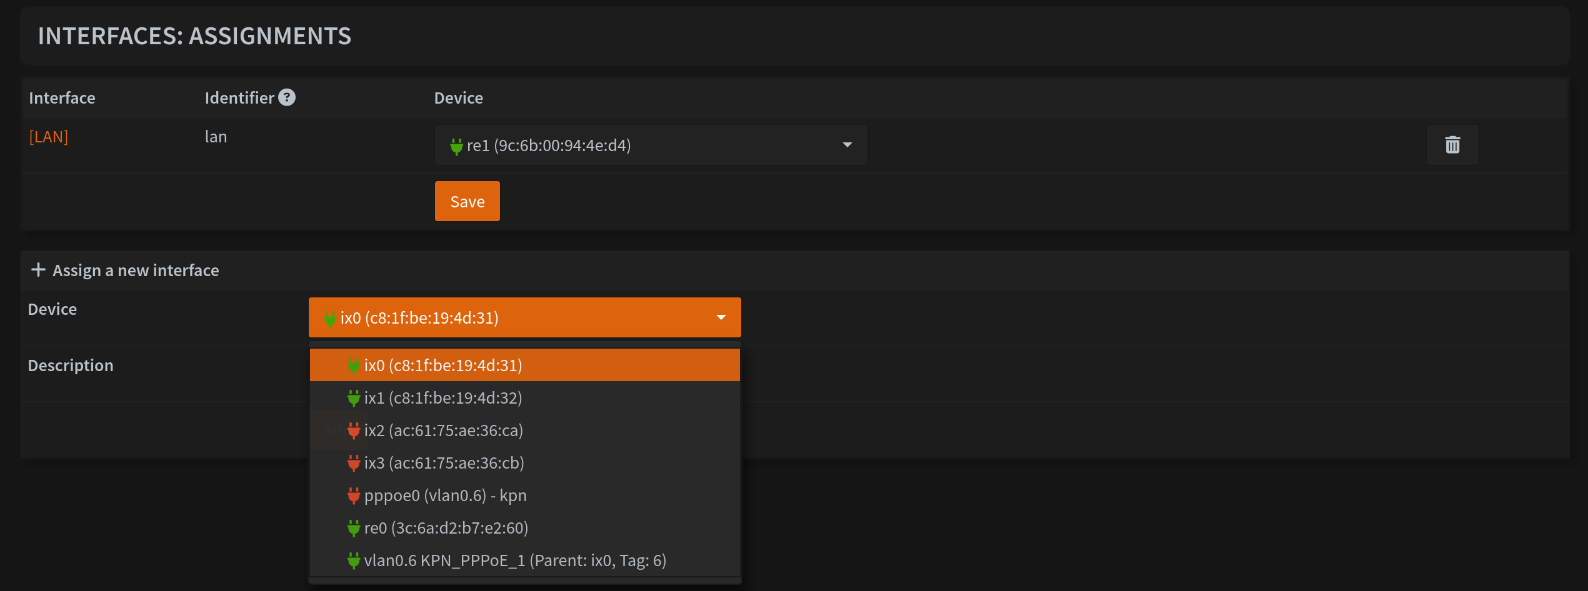
14.Then select the pppoe0 and give it a proper name. I like to call it WAN_1 s.t it is clear that it is the first WAN uplink with room for more uplinks in the future. For instance if you want to have a wireless cellular backup link for instance.
15. Then hit Save
16. Once that is done we will enter the WAN_1 connection to activate it by checking the box
- Enable Interface
17. Then finally we also want to block private IP addresses and only allow public IP addresses to flow into the PPPoE uplink. You do this by checking these boxes
- Block private networks
- Block bogon networks
18. Now, the IPv4 configuration is already set to PPPoE. It is then up to your ISP if you also got a static IPv6 block or not. To configure this you should have a look at the IPv6 Configuration section ;)
19. Then hit Save and if everything is well you should now be connected to the internet via a static PPPoE connection.
20. You can check this by going to System > Gateways > Configuration. This should show you a public gateway your OPNsense router is connected to
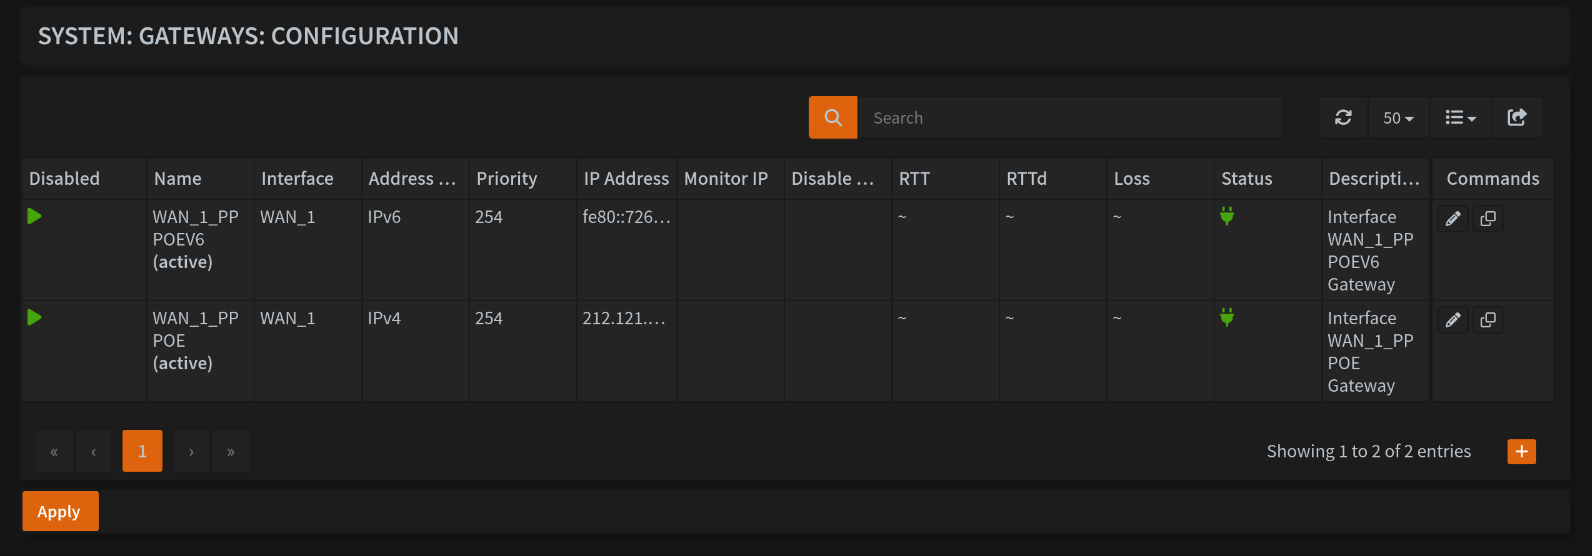
21. Finally, I like to implement gateway monitoring for the WAN uplink as well. This is actually mostly handy if you have multiple uplinks, to check if one gateway fails that it then automatically switches to the backup WAN link. But how to do all of this you can find at the
Multiple WAN section
5. Private DCHP WAN Uplink
In the scenario where you don't have access to the main uplink of your ISP e.g you are in a flat where the internet uplink is shared via a centralised router. Or if you have a direct connection from a building to the datacenter then this could also be an internal network by using protocols like OSPF. However, that is discussed in another chapter ;) Focused on the home user in this scenario your uplink will be a private IPv4 address and not public. Note, that because of this you cannot host any applicaions to the public internet, however with tools like Netbird you will still be able to access your applications from outside of your home LAN. Now, the setup is almost the same as for setting up a Public WAN with a minor change, namely at the network WAN step you need to toggle off
- Block RFC1918 Private Networks
- Block bogon networks
Otherwise it will block your private WAN DHCP uplink. All other settings will stay the same.
6. IPv4 CGNAT Setup
CGNAT is basically the worst setup you can possible have. This means the ISP simply does not have enough IPv4 addresses to give everyone an public IP address be it static or dynamic. In such a case your services will never be publicly accessible because you get a private IP address inside the internal network of the ISP instead of a publicly accessible IPv4 address. However, you can still host all your services by using technologies such as Netbird ;)
Often ISP's require you to be on a specific VLAN for static or dynamic IPv4 addresses. Some ISP's for instance don't have enough IPv4 addresses and place their customers behind CGNAT to safe IPv4 addresses for people that actually want them. In that case you could call them and see if they can change your CGNAT connection to a dynamic DHCP connection.