1.4 Storage
This Book will discuss the different types of storage you can attach to your virtual machines inside of Proxmox. Note, that this book will also discuss the restoration of storage that is broken for whatever reason.
- 1. ZFS Pools
- 2. NFS Shares (File Storage)
- 3. Object Storage
- 1. What is object storage ?
- 1. Garage S3
- 2. RustFS S3
- 3. SeaweedFS S3
- 4. Projects That use Object Storage
- 4. Restore ZFS Pools
- 5. Expanding ZFS Pools
- 6. ButterFS
- 7. MergeFS
- 8. Ceph
1. ZFS Pools
1. Creation of ZFS Pools in Proxmox
2. Deleting a ZFS Pool in Proxmox
Sometimes you want to delete a zfs pool because you have new drives or decided that you want to make an LVM or directory pool instead. For instance if you choose to host Truenas VM or PBS VM with virtual drives it is better to let PVE be an LVM pool and let the VM's handle the ZFS portion. This is because ZFS on top of ZFS is not recommended since it creates unnecessary overhead.
So to delete a zfs pool in proxmox you need to execute the following commands in the PVE shell
zfspool destroy POOLNAMEThen once it is destroyed you should also remove the zfspool entry located in /etc/pve/storage.cfg
nano /etc/pve/storage.cfgThen remove the zfspool lines that include the pool you want to destroy. However, to create a new pool or lvm/directory you still need to wipe the disk clean for proxmox to recognize it as a drive that has not been assigned yet.
For this go to pve > Disks > and then select the disks that were part of the zfspool that you just destoryed.
Then hit Wipe Disk and you are all set.
After that you can refresh the page and if all went well your zfspool should be gone by now.
2. NFS Shares (File Storage)
2. NFS Share
You're absolutely right. **Running NFS directly on Proxmox allows you to leverage Proxmox Backup Server (PBS) for native, integrated backups** of your storage, which is a significant advantage over virtualizing it in a TrueNAS VM.
When NFS runs directly on the Proxmox host, you can:
- **Use PBS's native backup capabilities** to back up your NFS storage without the overhead of managing backups through a virtualized appliance
- **Streamline your backup infrastructure** by keeping everything within the Proxmox ecosystem
- **Reduce complexity** — you don't need to manage backup scheduling and retention policies across separate systems
- **Maintain better performance** during backups since PBS can access the storage directly without VM virtualization overhead
In comparison, if NFS runs inside a TrueNAS VM, you'd need to either:
- Treat the entire VM as a backup target (less granular)
- Set up separate backup mechanisms within TrueNAS itself
- Back up the VM separately from any NFS data it serves
So from a backup and integration perspective, **native NFS on Proxmox + PBS is cleaner and more efficient** than the virtualized approach. This is especially true if you're already invested in the Proxmox ecosystem and want a unified storage and backup solution.
2. NFS Share on Proxmox with Cockpit + 45 drives plugin
Source: https://www.youtube.com/watch?v=Hu3t8pcq8O0
3. Object Storage
1. What is object storage ?
Benefits of Object Storage
- Scalability: Object storage solutions can handle large amounts of data, making them ideal for growing storage needs.
-
Global Accessibility: Data stored in object storage can be accessed from any location, facilitating collaboration among distributed teams.
-
Cost-Effectiveness: Many object storage services offer a pay-as-you-go model, which can be economical for varying storage requirements.
S3 Horizontal Scaling
S3 is truly horizontally scalable — you can store unlimited objects across multiple regions and availability zones without architectural changes. There's no practical upper limit on capacity or concurrent connections.
NFS/iSCSI Limitations
NFS and iSCSI don't scale horizontally in the same way, but the constraint differs:
-
NFS: A single NFS share (export) is limited by the backend storage system it's mounted from. You can add more NFS shares/exports, but you're adding discrete storage pools, not transparently scaling a single namespace. Multiple NFS shares require application-level awareness of where data lives.
-
iSCSI: Similar constraint — a single LUN is bounded by its underlying storage. You can add multiple LUNs, but again, you're managing separate storage targets, not seamless horizontal scaling.
For PBS Remote Backup Context
This is relevant: A PBS system backing up to NFS or iSCSI on a traditional SAN can hit capacity limits and requires manual expansion (adding new shares/LUNs). S3 removes this constraint entirely — capacity expands transparently.
However, PBS-to-PBS replication over a network still provides better deduplication than S3, even if S3 scales more elegantly. The trade-off is between efficiency (PBS-to-PBS) and unlimited scalability (S3).
So you're identifying a real architectural advantage of S3 that shouldn't be overlooked when designing remote backup infrastructure.
1. Garage S3
2. RustFS S3
3. SeaweedFS S3
4. Projects That use Object Storage
YouTube uses object storage to store and manage its vast library of videos efficiently. Object storage assigns each video a unique identifier and metadata, enabling fast retrieval and scalability across global storage pools.
4. Restore ZFS Pools
In this chapter we will explain how you can restore your ZFS pool if they are degraded. It is expected that you have setup Email or NTFY notificatons on your phone such that you always know when this happens and you can take action.
1. Restore a Proxmox ZFS pool
Source: Oneuptime
In the occasion that one of your Proxmox ZFS pools becomes degraded then this is one of the ways to restore your pool. Such a pool could be an OS, VM or a storage pool. Now, once you receive a proxmox notification (Don't forget to setup Proxmox notifications via Email or NTFY) that your pool is degraded you will see in the Proxmox GUI the following:
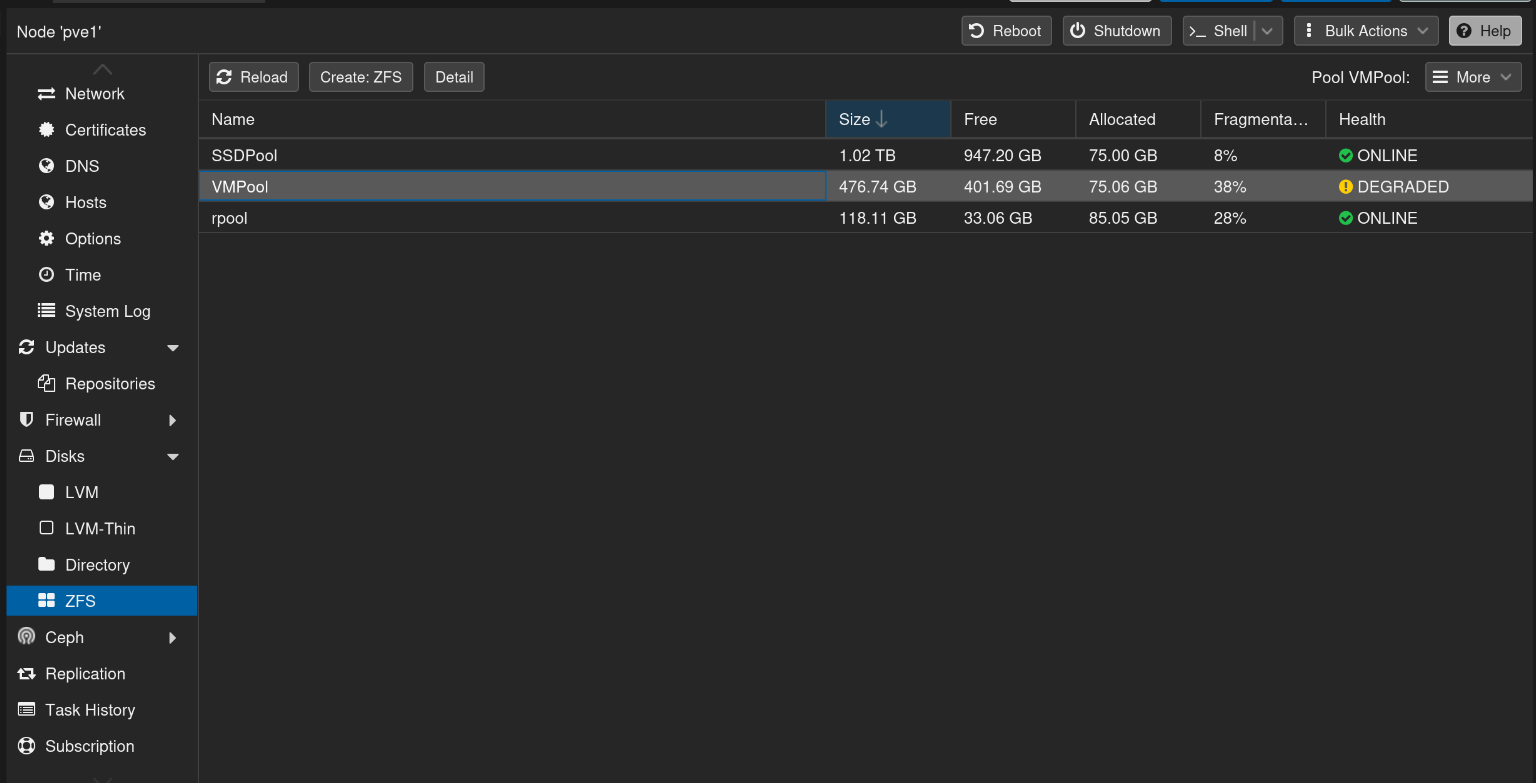
1. If you then double click on the Degraded pool you will see which drive is actually degraded and needs to be replaced.
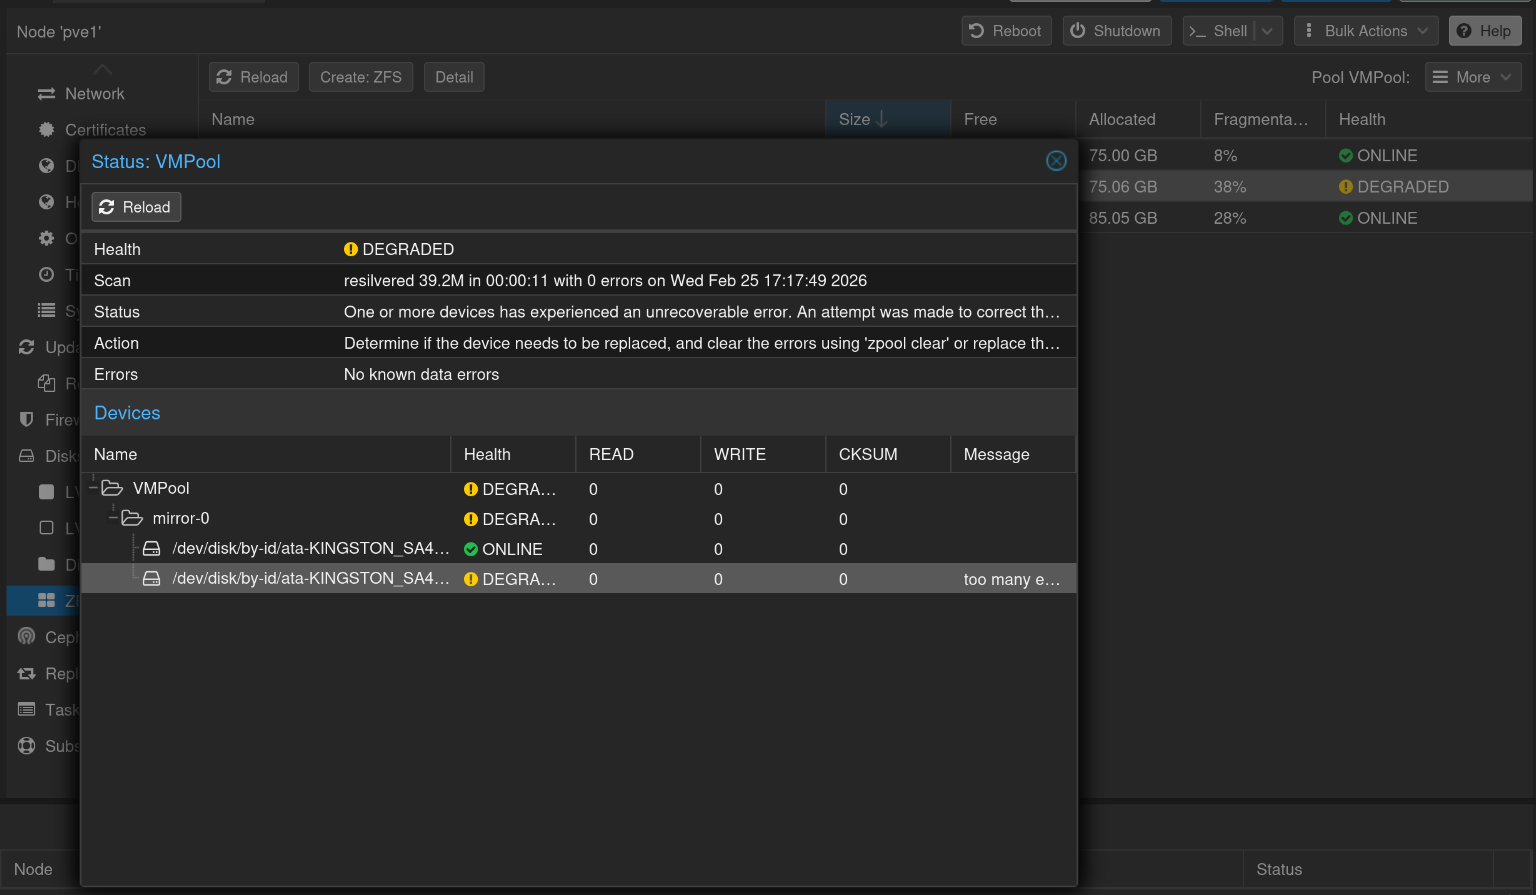
2. The note down the Serial Number of your degraded or failed drive s.t you can go into your machine and take out the failed drive.
3. Then take your new drive and insert it in the failed drive location.
4. Now, what is important is that you need to note down the serial number of the new drive that you have added. Luckily we can just go into Proxmox > Disks and we see an overview of all the disks that are connected to the Proxmox system
5. Then look for your drive in my case that is ata-Samsung_SSD_870_EVO_1TB_S75CNX0WC58810Y which is mount to /dev/sda and the degraded drive is ata-KINGSTON_SA400S37480G_50026B7785A335B4 mounted to /dev/sdc
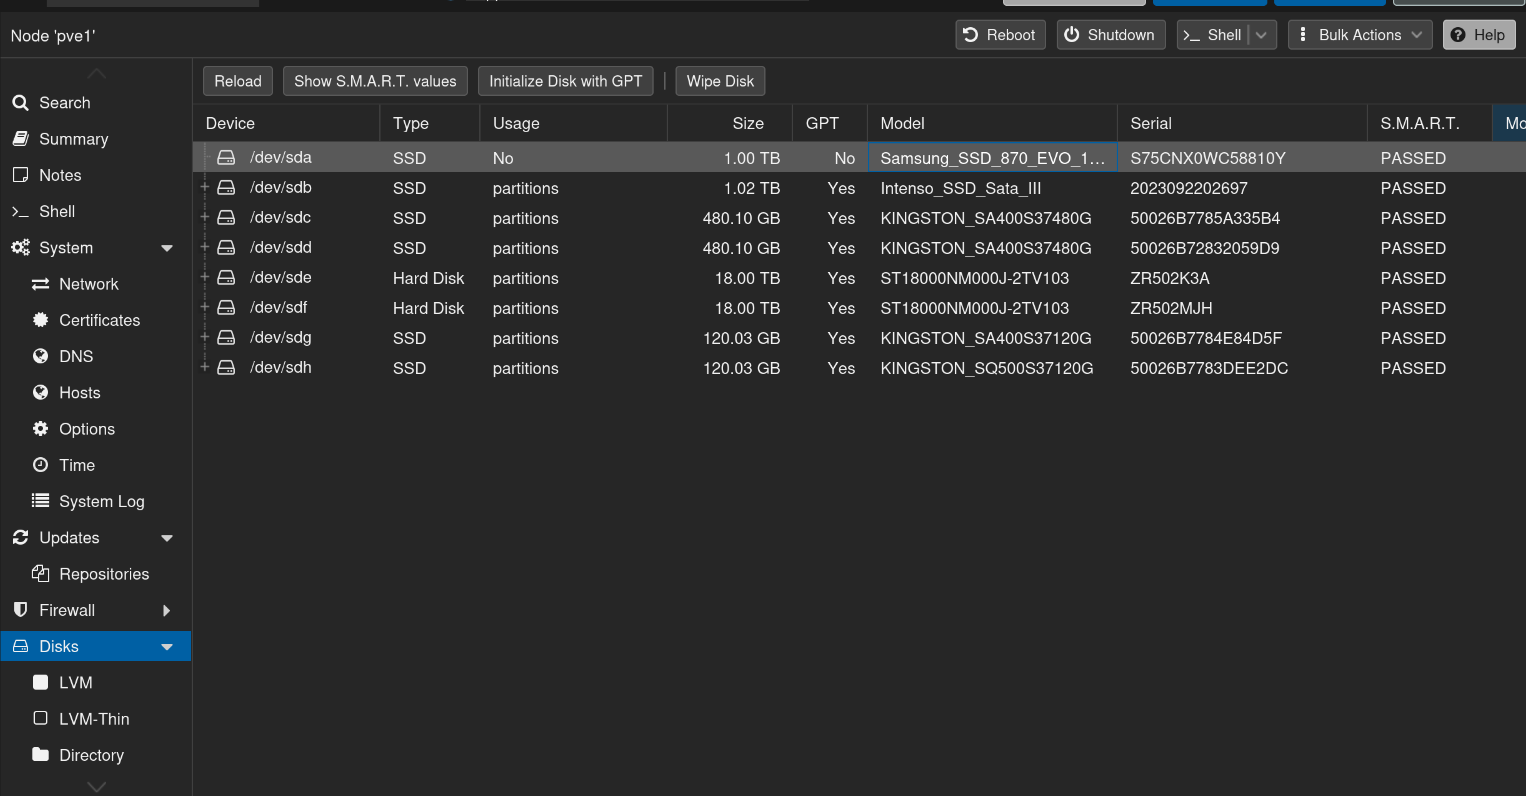
6. Then to make sure everything is removed from the new fresh disk and it is clean you will wipe the disk with the button Wipe Disk.
7. Then we will go into our Shell and use the command sudo zpool status <YOUR POOL NAME>
root@pve1:~# sudo zpool status VMPool
  pool: VMPool
 state: DEGRADED
status: One or more devices has experienced an unrecoverable error.  An
        attempt was made to correct the error.  Applications are unaffected.
action: Determine if the device needs to be replaced, and clear the errors
        using 'zpool clear' or replace the device with 'zpool replace'.
   see: https://openzfs.github.io/openzfs-docs/msg/ZFS-8000-9P
  scan: resilvered 104M in 00:00:01 with 0 errors on Fri Jul  3 22:47:08 2026
config:

        NAME                                            STATE     READ WRITE CKSUM
        VMPool                                          DEGRADED     0     0     0
          mirror-0                                      DEGRADED     0     0     0
            ata-KINGSTON_SA400S37480G_50026B72832059D9  ONLINE       0     0     2
            ata-KINGSTON_SA400S37480G_50026B7785A335B4  DEGRADED     0     0     0  too many errors

errors: No known data errors
8. Note down the disk that has failed or is degraded (ata-KINGSTON_SA400S37480G_50026B7785A335B4 in this case). Then as suggested in the actions we will use the command zpool replace to replace the failed drive.
sudo zpool replace POOLNAME /dev/disk/by-id/old-disk /dev/disk/by-id/new-diskThis will then result in this ;)
root@pve1:~# sudo zpool replace VMPool /dev/disk/by-id/ata-KINGSTON_SA400S37480G_50026B7785A335B4 /dev/disk/by-id/ata-Samsung_SSD_870_EVO_1TB_S75CNX0WC58810Y
root@pve1:~# zpool status VMPool
  pool: VMPool
 state: DEGRADED
status: One or more devices is currently being resilvered.  The pool will
        continue to function, possibly in a degraded state.
action: Wait for the resilver to complete.
  scan: resilver in progress since Fri Jul  3 23:29:16 2026
        69.8G / 69.8G scanned, 513M / 69.8G issued at 257M/s
        501M resilvered, 0.72% done, 00:04:36 to go
config:

        NAME                                               STATE     READ WRITE CKSUM
        VMPool                                             DEGRADED     0     0     0
          mirror-0                                         DEGRADED     0     0     0
            ata-KINGSTON_SA400S37480G_50026B72832059D9     ONLINE       0     0     2
            replacing-1                                    DEGRADED     0     0     0
              ata-KINGSTON_SA400S37480G_50026B7785A335B4   OFFLINE      0     0     0
              ata-Samsung_SSD_870_EVO_1TB_S75CNX0WC58810Y  ONLINE       0     0     0  (resilvering)

errors: No known data errors
root@pve1:~#
9. We can now see that after the replace command that the VMPool is resilvering straight away. Since, it is a mirror zfspool the resilvering process can go really quick.
10. Then you will get a notification via NTFY or Email once the resilvering process is done. If it is a long resilvering process you can check the progress of the resilvering progress by using the zpool status POOLNAME command.
Awesome! You replaced your old drive with a new one ! basically in 15 minutes!! That was not that hard was it ;)
2. Restore a TrueNas ZFS pool
5. Expanding ZFS Pools
Not for everyone but there might come a day that you want to expand your ZFS pools because well, you simply have to much data yourself or you added to many users to it. Then in this section we will show how you could expand your ZFS pool without loosing any of your data. We will do this both for Proxmox and TrueNas ZFS pools.
1. Expanding Proxmox ZFS Pool
The consensus among ZFS experts depends on your constraints:
-
If you have spare bays and older drives: Many recommend starting replacement earlier (around 65% full) with one drive at a time, turning the old drive into a spare. practicalzfs.com This keeps your drives fresher and spreads the replacement timeline.
-
If you're space-constrained or prefer simplicity: The double-resilver approach you mentioned works fine, especially if you have solid backups. practicalzfs.com
-
If you're concerned about failure risk during resilvering: Adding a new vdev is safer since your existing mirror remains intact during the expansion. Then instead of resilvering you could just reconstruct your VM's on your new expanded ZFS pool from a backup. Then once they are running you can turn off your existing VM's on the old storage and eventually delete them.
The key consideration ZFS experts emphasize is drive age—mechanical drives typically shouldn't run much longer than a decade regardless of health appearance, and running multiple drives while resilvering increases failure risk.