1.5.17 Arr Stack
In this chapter we follow roughly the guidelines from Techhut Instruction Video and the Trash Guides guide. However, there are other methods as well of course.
- 01. Architectural Overview
- 03. Mount NFS Share inside Arr VM
- 02. Creating a NFS Share
- 04. Folder Structure
- 05. Creating the Docker Compose file
- 06. qBittorent
- 07. NZBGet
- 08. Radarr
- 09. Sonarr
- 10. Prowlarr
- 11. Profillar
- 12. Seerr
- 13. Bazaarr
- Jellyfin Clients
- 14. Jellyfin Themes
- 15. Jellyfin Plugins
- 16. Jellyfin Enhanced
01. Architectural Overview
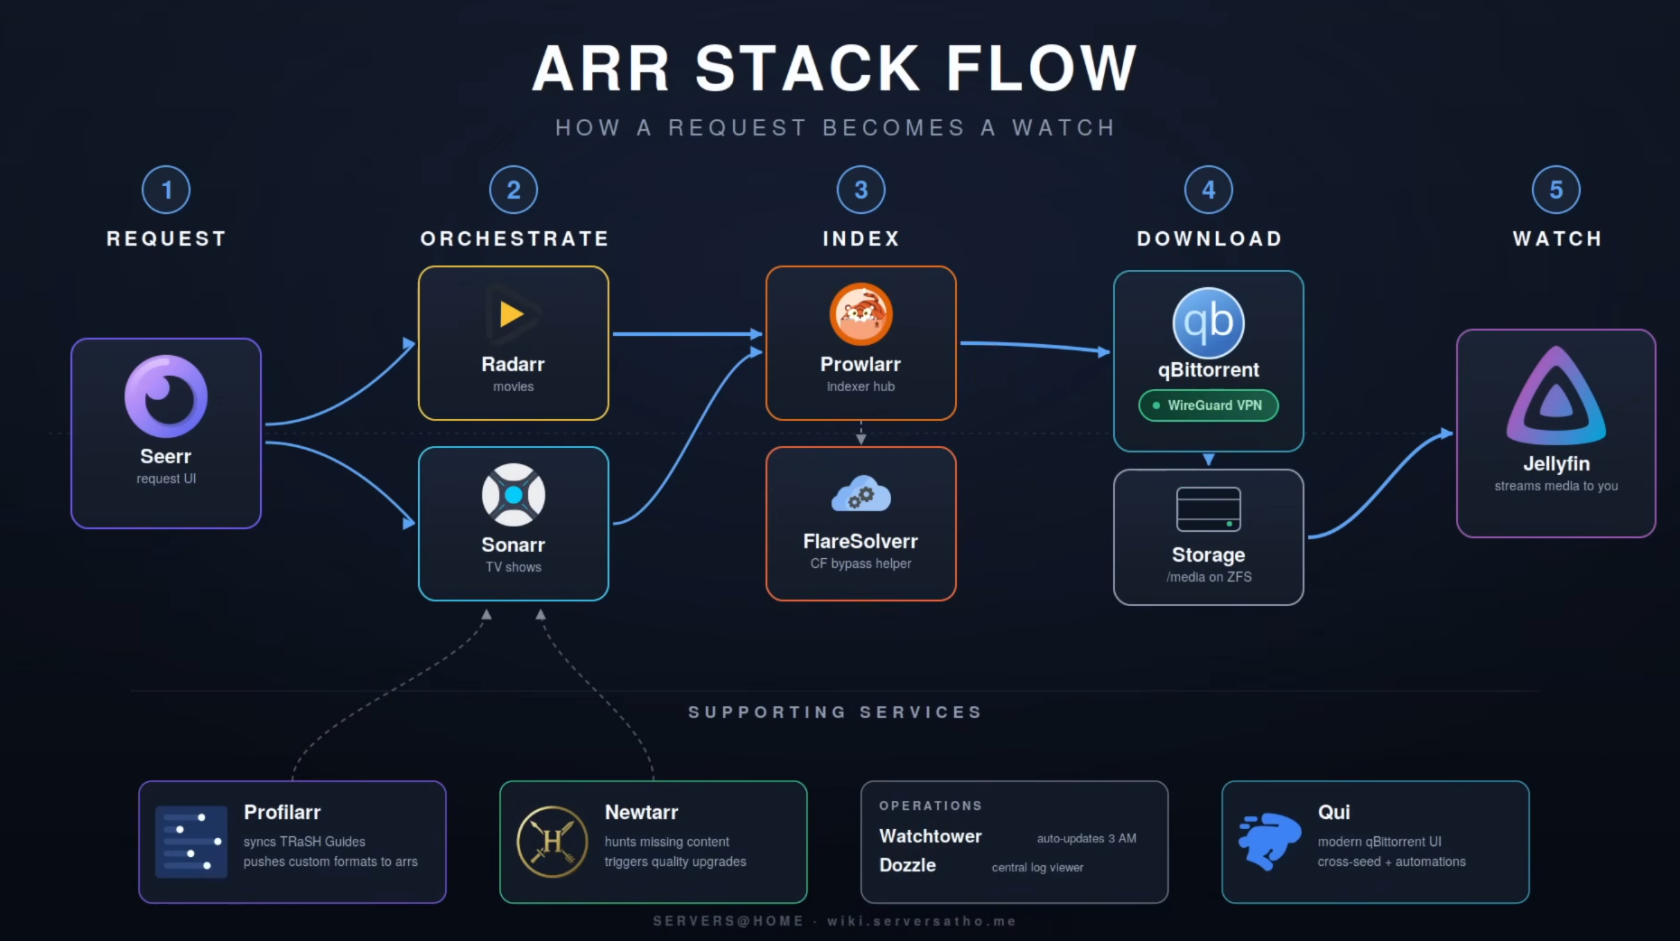
Movie/Show Request
- A user makes a request via Seerr, which is basically a catalogue of all the existing movies and tv shows and upcoming ones. This is where the end user will interact with for requests. Everything else from 2-4 is not publicly accessible. Only 1 and 5 are in the whole process.
- Then the request will end up in Radarr for movies and Sonarr for TV shows.
- Radarr and Sonarr are open-source applications designed for automating the downloading of movies and TV shows, respectively. They help users track their favorite media, automatically search for new episodes or films, and manage downloads through a user-friendly web interface.
Overview of the Request Process
Radarr/Sonarr and Prowlarr work in tandem to automate the downloading of movies. Here’s how the process unfolds:
- Search Request: Radarr/Sonarr initiates a search request for a specific movie/show.
- Querying Indexers: Prowlarr receives this request and queries all its configured indexers.
- Returning Results: The results from the indexers are sent back to Prowlarr.
- Final Decision: Prowlarr then forwards these results back to Radarr/Sonarr, which makes the final decision on which movie/show/episode to download.
Download clients
- After the correct movie/show has been confirmed depending on if its a usenet or torrent file is then send to one of the download clients they are connected to.
- Examples of these download clients are nzbget for usenet and qbittorrent for torrents.
- They go out and download the movies/shows to your hard drives
Front end Jellyfin Clients
List of all Jellyfin clients
Then finally you have multiple front ends that users can interact with to actually watch their movies and shows. Basically Jellyfin sits in the backend and any application that can speak to the Jellyfin API can represent this media how they seem fit. Famous ones I like are
- Fladder for Android Mobile and Laptops (It allows Seerr to be integrated into one application)
- Jellyfin for TV
- Kodi with a sweet theme for the TV
- For iOS devices I would recommend
03. Mount NFS Share inside Arr VM
Now, that we have created an NFS share we should mount it inside the VM. But before we can mount it we need to install the NFS tools such that it can talk the NFS langauge. This is fairly straightforward with the following commands
1. Within the VM install cifs-utils
sudo apt install cifs-utils
2. Now, edit the fstab file and add the following lines editing them to match your information:
sudo nano /etc/fstabIP Address arr VM:/mnt/pool/dataset_name /mnt/data nfs defaults 0 04. Once that is saved we restart the daemon and mount the file share
sudo systemctl daemon-reload
sudo mount -a
5.
02. Creating a NFS Share
Since this stack will save lots of big files i.e movies and tv shows we will create an NFS share for this on our TrueNas VM. You don't need to use TrueNas obviously to create an NFS share but this guide uses TrueNas and hence we do that ;)
1. First we will create a new dataset in TrueNas
2. Go to Datasets -> Click on Add Dataset
3. Give it a name you like
4. Leave the Dataset Preset to Generi
5. Create the dataset ;)
6. Once that is done we click on the dataset and we need to change its permissions
7. Edit the permissions and make sure that the User 1000 has the read write and Execute permissions on both the User and Group section. Leave all the other boxes for Other unchecked.
8. Sweet! Then finally we will make an NFS share that our Arr Stack will utilize to download and store content on.
10. Then give it a name and choose the dataset for your Arr Stack.
11. For now you can leave the networks and hosts as it is. We can later restrict it by only allowing the Arr stack access to it but that's for later.
12. Cheers!! you made the Arr Stack NFS share !
Awesome, Let's now look at the folder structure ;)
04. Folder Structure
It's good practice to give all containers the same access to the same root directory or share. This is why all containers in the compose file have the bind volume mount /data:/data. It makes everything easier, plus passing in two volumes such as the commonly suggested /tv, /movies, and /downloads makes them look like two different file systems, even if they are a single file system outside the container. See my current setup below.
data
├── books
├── downloads
│   ├── qbittorrent
│   │   ├── completed
│   │   ├── incomplete
│   │   └── torrents
│   └── nzbget
│       ├── completed
│       ├── intermediate
│       ├── nzb
│       ├── queue
│       └── tmp
├── movies
├── music
├── shows
└── youtube
1. Now, to implement this we will move into our NFS share inside our VM and create the above folder structure with the command
mkdir -p downloads/qbittorrent/{completed,incomplete,torrents} && mkdir -p downloads/nzbget/{completed,intermediate,nzb,queue,tmp}2. Perfect! You can check with "ls" if the folder structure was actually created correctly.
3. Now, to get the permissions right we need to move back into TrueNas to have the ownership of the folders recursively owned by user 1000 and group 1000.
4. Go to TrueNas -> Datasets -> DATASET_NAME -> Click on Permissions
5. In here make sure that the 6 top blocks are all set and that you check the boxes
- Apply User
- Apply Group
- Apply permissions recursively.
6. Then accept the Warning and save the permission. Sweet! now you are ready to start setting up the docker compose file and can be sure that all the containers have the proper permissions to all the folders.
05. Creating the Docker Compose file
Now, that the NFS share and folder structure is created and added to the Virtual machine with /etc/fstab we can start creating the docker compose file and its environment ".env" file. It must be said that this docker compose file is basically a copy paste from the compose file created by home lab teacher Techhut. You can find his compose file here. In this docker page I will first explain all the different components and what they do. However, you can also directly copy and paste docker compose and environment file if you want of course.
Docker Compose File
networks:
  servarrnetwork:
    name: servarrnetwork
    ipam:
      config:
        - subnet: 172.39.0.0/24
services:
  gluetun:
    image: qmcgaw/gluetun
    container_name: gluetun
    cap_add:
      - NET_ADMIN
    devices:
      - /dev/net/tun:/dev/net/tun # If running on an LXC see readme for more info.
    networks:
      servarrnetwork:
        ipv4_address: ${SET_IP_GLUETUN}
    ports:
      - 8080:8080 # qbittorrent web interface
      - 6881:6881 # qbittorrent torrent port
      - 6789:6789 # nzbget
      - 9696:9696 # prowlarr
      - 8191:8191 # flaresolverr
    volumes:
      - ./gluetun:/gluetun
    # Make a '.env' file in the same directory.
    env_file:
      - .env
    healthcheck:
      test: ping -c 1 www.google.com || exit 1
      interval: 20s
      timeout: 10s
      retries: 5
    restart: unless-stopped
  qbittorrent:
    image: lscr.io/linuxserver/qbittorrent:latest
    container_name: qbittorrent
    restart: unless-stopped
    labels:
      - deunhealth.restart.on.unhealthy=true
    environment:
      - PUID=${PUID}
      - PGID=${PGID}
      - TZ=${TZ}
      - WEBUI_PORT=8080 # must match "qbittorrent web interface" port number in gluetun's service above
      - TORRENTING_PORT=${FIREWALL_VPN_INPUT_PORTS} # airvpn forwarded port, pulled from .env
    volumes:
      - ./qbittorrent:/config
      - ${ROOT_DIR}:/data
    depends_on:
      gluetun:
        condition: service_healthy
        restart: true
    network_mode: service:gluetun
    healthcheck:
      test: ping -c 1 www.google.com || exit 1
      interval: 60s
      retries: 3
      start_period: 20s
      timeout: 10s
  # See the 'qBittorrent Stalls with VPN Timeout' section for more information.
  deunhealth:
    image: qmcgaw/deunhealth
    container_name: deunhealth
    network_mode: none
    environment:
      - LOG_LEVEL=info
      - HEALTH_SERVER_ADDRESS=127.0.0.1:9999
      - TZ=${TZ}
    restart: always
    volumes:
      - /var/run/docker.sock:/var/run/docker.sock
  nzbget:
    image: lscr.io/linuxserver/nzbget:latest
    container_name: nzbget
    environment:
      - PUID=${PUID}
      - PGID=${PGID}
      - TZ=${TZ}
    volumes:
      - /etc/localtime:/etc/localtime:ro
      - ./nzbget:/config
      - ${ROOT_DIR}:/data
    depends_on:
      gluetun:
        condition: service_healthy
        restart: true
    restart: unless-stopped
    network_mode: service:gluetun
  prowlarr:
    image: lscr.io/linuxserver/prowlarr:latest
    container_name: prowlarr
    environment:
      - PUID=${PUID}
      - PGID=${PGID}
      - TZ=${TZ}
    volumes:
      - /etc/localtime:/etc/localtime:ro
      - ./prowlarr:/config
    restart: unless-stopped
    depends_on:
      gluetun:
        condition: service_healthy
        restart: true
    network_mode: service:gluetun
  flaresolverr:
    image: ghcr.io/flaresolverr/flaresolverr:latest
    container_name: flaresolverr
    environment:
      - LOG_LEVEL=${LOG_LEVEL:-info}
      - LOG_HTML=${LOG_HTML:-false}
      - CAPTCHA_SOLVER=${CAPTCHA_SOLVER:-none}
      - TZ=${TZ}
    depends_on:
      gluetun:
        condition: service_healthy
        restart: true
    network_mode: service:gluetun
    restart: unless-stopped
  sonarr:
    image: lscr.io/linuxserver/sonarr:latest
    container_name: sonarr
    restart: unless-stopped
    environment:
      - PUID=${PUID}
      - PGID=${PGID}
      - TZ=${TZ}
    volumes:
      - /etc/localtime:/etc/localtime:ro
      - ./sonarr:/config
      - ${ROOT_DIR}:/data
    ports:
      - 8989:8989
    networks:
      servarrnetwork:
        ipv4_address: ${SET_IP_SONARR}
  radarr:
    image: lscr.io/linuxserver/radarr:latest
    container_name: radarr
    restart: unless-stopped
    environment:
      - PUID=${PUID}
      - PGID=${PGID}
      - TZ=${TZ}
    volumes:
      - /etc/localtime:/etc/localtime:ro
      - ./radarr:/config
      - ${ROOT_DIR}:/data
    ports:
      - 7878:7878
    networks:
      servarrnetwork:
        ipv4_address: ${SET_IP_RADARR}
  lidarr:
    container_name: lidarr
    image: lscr.io/linuxserver/lidarr:latest
    restart: unless-stopped
    volumes:
      - /etc/localtime:/etc/localtime:ro
      - ./lidarr:/config
      - ${ROOT_DIR}:/data
    environment:
      - PUID=${PUID}
      - PGID=${PGID}
      - TZ=${TZ}
    ports:
      - 8686:8686
    networks:
      servarrnetwork:
        ipv4_address: ${SET_IP_LIDARR}
  bazarr:
    image: lscr.io/linuxserver/bazarr:latest
    container_name: bazarr
    restart: unless-stopped
    environment:
      - PUID=${PUID}
      - PGID=${PGID}
      - TZ=${TZ}
    volumes:
      - /etc/localtime:/etc/localtime:ro
      - ./bazarr:/config
      - ${ROOT_DIR}:/data
    ports:
      - 6767:6767
    networks:
      servarrnetwork:
        ipv4_address: ${SET_IP_BAZARR}
  seerr:
    container_name: seerr
    image: ghcr.io/seerr-team/seerr:latest
    environment:
      - LOG_LEVEL=debug
      - PUID=${PUID}
      - PGID=${PGID}
      - TZ=${TZ}
    healthcheck:
      test: wget --no-verbose --tries=1 --spider http://localhost:5055/api/v1/status
        || exit 1
      start_period: 20s
      timeout: 3s
      interval: 15s
      retries: 3
    restart: unless-stopped
    volumes:
      - ./seerr:/app/config
    ports:
      - 5055:5055
    networks:
      servarrnetwork:
        ipv4_address: ${SET_IP_SEERR}
  # jellystat-db:
  #   image: postgres:18.1
  #   container_name: jellystat-db
  #   restart: unless-stopped
  #   shm_size: '1gb'
  #   environment:
  #     - POSTGRES_USER=${JELLYSTAT_POSTGRES_USER}
  #     - POSTGRES_PASSWORD=${JELLYSTAT_POSTGRES_PASSWORD}
  #   volumes:
  #     - ./jellystat/postgres-data:/var/lib/postgresql/data
  #   healthcheck:
  #     test: ["CMD-SHELL", "pg_isready --dbname=postgres --username=${JELLYSTAT_POSTGRES_USER}"]
  #     interval: 10s
  #     timeout: 5s
  #     retries: 5
  #   networks:
  #     servarrnetwork:
  #       ipv4_address: ${SET_IP_JELLYSTAT_DB}
  #
  # jellystat:
  #   image: cyfershepard/jellystat:latest
  #   container_name: jellystat
  #   restart: unless-stopped
  #   environment:
  #     - POSTGRES_USER=${JELLYSTAT_POSTGRES_USER}
  #     - POSTGRES_PASSWORD=${JELLYSTAT_POSTGRES_PASSWORD}
  #     - POSTGRES_IP=jellystat-db
  #     - POSTGRES_PORT=5432
  #     - JWT_SECRET=${JELLYSTAT_JWT_SECRET}
  #     - TZ=${TZ}
  #   volumes:
  #     - ./jellystat/backup-data:/app/backend/backup-data
  #   ports:
  #     - 3000:3000
  #   depends_on:
  #     jellystat-db:
  #       condition: service_healthy
  #   healthcheck:
  #     test: wget --no-verbose --tries=1 --spider http://localhost:3000/auth/isConfigured || exit 1
  #     interval: 60s
  #     timeout: 30s
  #     retries: 5
  #     start_period: 30s
  #   networks:
  #     servarrnetwork:
  #       ipv4_address: ${SET_IP_JELLYSTAT}
Environment Variables
# General UID/GID and Timezone
TZ=America/Los_Angeles
PUID=1000
PGID=1000

# Input your VPN provider and type here
VPN_SERVICE_PROVIDER=airvpn
VPN_TYPE=wireguard

# Mandatory, airvpn forwarded port
FIREWALL_VPN_INPUT_PORTS=port

# Copy all these variables from your generated configuration file
WIREGUARD_PUBLIC_KEY=key
WIREGUARD_PRIVATE_KEY=key
WIREGUARD_PRESHARED_KEY=key
WIREGUARD_ADDRESSES=ip

# Optional location variables, comma separated list, no spaces after commas, make sure it matches the config you created
# NOTE: These can cause connection failures with some providers. Remove or comment out if Gluetun won't connect.
#SERVER_COUNTRIES=country
#SERVER_CITIES=city

# Health check duration
HEALTH_VPN_DURATION_INITIAL=120s

# Static IPs for services on servarrnetwork
SET_IP_GLUETUN=172.39.0.2
SET_IP_SONARR=172.39.0.3
SET_IP_RADARR=172.39.0.4
SET_IP_LIDARR=172.39.0.5
SET_IP_BAZARR=172.39.0.6
SET_IP_SEERR=172.39.0.7
SET_IP_JELLYSTAT_DB=172.39.0.8
SET_IP_JELLYSTAT=172.39.0.9

# Jellystat (uncomment service block in compose.yaml to enable)
JELLYSTAT_POSTGRES_USER=postgres
JELLYSTAT_POSTGRES_PASSWORD=changeme
JELLYSTAT_JWT_SECRET=changeme
Network
- First of all an internal docker network is created called "servarrnetwork"
- Then we give this network as well a subnet in a /24. This can be any private subnet you please since it is only internal
Gluetun
So what does this docker compose file represent ? What is the workflow here ?
06. qBittorent
In this section we will setup our qBittorrent downloading client.
1. First get your temporary password that is provided to login which you can find in the logs. Use the command
sudo docker logs qbittorrentExample output
[migrations] started
[migrations] no migrations found
───────────────────────────────────────
██╗ ███████╗██╗ ██████╗
██║ ██╔════╝██║██╔═══██╗
██║ ███████╗██║██║ ██║
██║ ╚════██║██║██║ ██║
███████╗███████║██║╚██████╔╝
╚══════╝╚══════╝╚═╝ ╚═════╝
Brought to you by linuxserver.io
───────────────────────────────────────
To support LSIO projects visit:
https://www.linuxserver.io/donate/
───────────────────────────────────────
GID/UID
───────────────────────────────────────
User UID: 1000
User GID: 1000
───────────────────────────────────────
Linuxserver.io version: 5.2.1_v2.0.13-ls460
Build-date: 2026-06-08T23:02:32+00:00
───────────────────────────────────────
[custom-init] No custom files found, skipping...
WebUI will be started shortly after internal preparations. Please wait...
******** Information ********
To control qBittorrent, access the WebUI at: http://localhost:8080
The WebUI administrator username is: admin
The WebUI administrator password was not set. A temporary password is provided for this session: yfUHUIHFX
You should set your own password in program preferences.
Connection to localhost (::1) 8080 port [tcp/http-alt] succeeded!
2. Then go to IP address:8080 and login with "admin" and your temporary password
3. Once logged in you can change your password and username by going to Settings > WebUI
4.
5. What's next is setting up the directory scheme for the torrent files
6. Go to Settings > Downloads
7. Then Look for
Default save path: /data/torrents/completed
Keep incomplete torrents in: /data/torrents/incomplete
Copy torrent files to: /data/torrents/torrents
8. Congratz now your qBittorent client is all set
07. NZBGet
For a Usenet downloading client we choose NZBget. Yes this is not the only one out there but it is leightweight and efficient. If your container is up and running you can find your NZB instance at
IP address VM:6789
- Now, the first time that you will login you will need the standard login credentials which are
Default credentials:
Username: nzbget
Password: tegbzn6789
- As with any platform we first change the user credentials. Go to Settings > Security > Change username and Password
Download Folders
- Next we will setup up the download folders nzbget will use for its downloads. We already configured them in our folder structure so that will be a piece of cake
- For this go to Settings > Paths
In here we will specify
Main Dir: /data/usenet/
DestDir: /data/usenet/completed
InterDir: /data/usenet/incompleted
- This is again according to the Trash Guide folder structure we created in the beginning. If you then hit Save and Apply it should give you no errors. If nzbget cannot reach the folders for writing permissions or they don't exist then it will tell you with a red banner.
News-Server
- Now, we will setup our new server. It is up to you which news server you choose however regardless you will need 3 items. Your username, password and the host URL. If you have obtained these credentials by login in to you news reader then you can go to Settings > News-Server
- Fill in a name for the News-server
- Fill in the username
- Fill in the password
- Fill in the host URL
- By hitting save and apply everything should be good if you did not receive any errors.
- Aweseom then your downloading clients are set and we can move on
Categories
Now, we have created the folders movies, tv, books and music inside the completed usenet folder. We now need to tell nzbget about these locations through the means of categories.
- Go to Settings > Categories
- Add the Categories movies, tv, books and music. Make sure it is all in lower case ;)
NZBGET Health
Health
A decreasing health for a movie in NZBGet typically indicates that the files are becoming less available or are missing parts, making it difficult to download them successfully. This can happen due to content takedowns or the age of the files, leading to failed downloads
Extraction
Files need to be extracted from .rar archives in NZBGet because they are compressed to save space and facilitate faster downloads. Extracting them allows you to access the original files contained within the archive
08. Radarr
1. Create Account
Now, that we have setup our Download clients i.e qBittorent and NZBGet we will configure Radarr, Sonarr, Lidarr, Bazaarr. However, we will only demonstrate one of the 4 since the configuration is exactly the same
- Go to your Radarr's IP address :7878
- Once, there you will start making an account. For this you can again use Bitwarden to create random login credentials for your instance
2. Media Management
- in this step we will assign the folders in which the radarr files will reside
- Go to Settings > Media Management > Add root folder
- Here you will choose the movie folder you have created in your docker compose file. If you follow this guide this would be at /data/media/Movies
- Congratulations, now you have told Radarr where to store all the movies.
3. Downloading Clients
Now we will connect the downloading clients qBittorent and nzbget to Radarr for it to use.
- Go to Settings > Downloading Clients > + add
- Select qBittorent and fill in the credentials of your qBittorent downloading client
- Once done, add another client but this time choose for nzbget.
- Also fill in here the credentials of your nzbget client with the category movies
- Awesome you are all set !
4. Indexers
The final thing we need to setup for our Radarr instance are indexers. However, we will use Prowlarr for this as a centralised indexer for all ARR apps. The only thing we need for Prowlarr to
connect to Radarr is it's API key.
- Go to Settings > General
- Copy paste the API key
09. Sonarr
1. Create Account
For Sonarr it will be quite similar as for Radarr
- Go to your Radarr's IP address:8989
- Once, there you will start making an account. For this you can again use Bitwarden to create random login credentials for your instance
2. Media Management
- in this step we will assign the folders in which the radarr files will reside
- Go to Settings > Media Management > Add root folder
- Here you will choose the movie folder you have created in your docker compose file. If you follow this guide this would be at /data/media/tvshows
- Congratulations, now you have told Radarr where to store all the movies.
3. Downloading Clients
Now we will connect the downloading clients qBittorent and nzbget to Radarr for it to use.
- Go to Settings > Downloading Clients > + add
- Select qBittorent and fill in the credentials of your qBittorent downloading client
- Once done, add another client but this time choose for nzbget.
- Also fill in here the credentials of your nzbget client with the category "tv"
- Awesome you are all set !
4. Indexers
The final thing we need to setup for our Radarr instance are indexers. However, we will use Prowlarr for this as a centralised indexer for all ARR apps. The only thing we need for Prowlarr to
connect to Radarr is it's API key.
- Go to Settings > General
- Copy paste the API key
10. Prowlarr
So Prowlarr is an indexer manager and proxy that integrates with various PVR (Personal Video Recorder) applications, allowing users to manage both Torrent Trackers and Usenet Indexers seamlessly. It works with applications like Radarr, Sonarr, and Lidarr to automate the process of finding and downloading media content. In other words it basically tells all the other ARR applications about the indexers that are available to use to find media content.
Prowlarr Apps
- Go to Radarr and obtain its API key at Settings > General > API key
- Then open up Prowlarr at VMIP:9696
- Go to Settings > Apps > + Icon
- Then make sure you fill in the subnet IP you created for the servarrnetwork. For instance if your servarrnetwork is 172.44.0.1/24 then your subnet IP will be 172.44.0.1
Prowlar Indexers
Setting up the nzbgeek indexer in Prowlarr
11. Profillar
The next ARR app we will install is profillar. This one, is just really important since it allow you to filter what type and size of content you want all don automatically. If you don't have that much storage space you would not want to download 4K content all the time for instance. On top of that it is hard to see the difference between 4K and 1080p anwyays, even 720p does well on smaller screens. Personally I download everything in 1080p or 720p if I don't care about it to much. The 4K is really not visible on my TV anyways. It gives you just great control over your quality and storage space you have access to.
- Go to VMIP:6868
- Create an account
- The first thing we will do just as with Prowlarr is connect it to Radarr and Sonarr.
- Grab your API keys from both apps again
- Go to Settings > External Apps > Add Radar and then add Sonarr. The IP address for both Sonarr and Radarr is your VMIP
Quality Profiles
- After this we need to add a quality profile repository to our profillar app. There are many different repositories but the one that seems used most often is the following
https://github.com/Dictionarry-Hub/database - Then go to
Media Management
- Go back to Radarr and Sonarr
- Go to General > Media Management > Click on Advanced in the left top corner
- Then scroll down to Propers and Repacks and select "DO NOT PREFER"
12. Seerr
13. Bazaarr
Jellyfin Clients
🌎 Browser-Based
| Name | OSS | Free | Paid | Downloads |
|---|---|---|---|---|
ampcast ⚒️ 🎵 |
✅ | ✅ | ❎ |  |
Aperture ⚒️ |
✅ | ✅ | ❎ |  |
Feishin ⚒️ 🎵 |
✅ | ✅ | ❎ |  |
| Finetic | ✅ | ✅ | ❎ |  |
| Fladder | ✅ | ✅ | ❎ |    |
Jelly Music App 🎵 |
✅ | ✅ | ❎ |  |
Jellyfin Vue 🔹 ⚒️ |
✅ | ✅ | ❎ |   |
Jellyfin Web 🔹 |
✅ | ✅ | ❎ |  |
| Jellyflix | ✅ | ✅ | ❎ |   |
| Moonfin | ✅ | ✅ | ❎ |    |
| Pelagica | ✅ | ✅ | ❎ |  |
Preserve ⚒️ 🎵 |
✅ | ✅ | ❎ |  |
Shadfin ⚒️ |
✅ | ✅ | ❎ |  |
sonixd ⚒️ 🎵 |
✅ | ✅ | ❎ |  |
💻 Desktop
Windows
| Name | OSS | Free | Paid | Downloads |
|---|---|---|---|---|
ampcast ⚒️ 🎵 |
✅ | ✅ | ❎ | |
Blink ⚒️ |
✅ | ✅ | ❎ |  |
Bloodin ⚒️ |
✅ | ✅ | ❎ | |
Feishin ⚒️ 🎵 |
✅ | ✅ | ❎ | |
| Fladder | ✅ | ✅ | ❎ | |
FluentFin ⚒️ |
✅ | ✅ | ❎ |  |
Foxy 🎵 |
✅ | ✅ | ❎ |  |
| Hills | ❌ | ✅ | ☑️ |  |
| iPlay | ✅ | ✅ | ❎ |   |
Jelly Music App 🎵 |
✅ | ✅ | ❎ | |
Jellyamp 🎵 |
✅ | ✅ | ❎ |  |
Jellyfin Media Player 🔹 |
✅ | ✅ | ❎ |   |
Jellyfin MPV Shim 🔹 |
✅ | ✅ | ❎ |   |
| Jellyflix | ✅ | ✅ | ❎ | |
| Moonfin | ✅ | ✅ | ❎ | |
| Playtorrio | ✅ | ✅ | ❎ |  |
Preserve ⚒️ 🎵 |
✅ | ✅ | ❎ | |
| Rodel Player | ❌ | ✅ | ❎ | |
Sonixd ⚒️ 🎵 |
✅ | ✅ | ❎ | |
Supersonic ⚒️ 🎵 |
✅ | ✅ | ❎ |   |
Switchfin ⚒️ |
✅ | ✅ | ❎ |  |
Tauon Music Box 🎵 |
✅ | ✅ | ❎ |   |
tsukimi ⚒️ |
✅ | ✅ | ❎ |  |
macOS
| Name | OSS | Free | Paid | Downloads |
|---|---|---|---|---|
ampcast ⚒️ 🎵 |
✅ | ✅ | ❎ | |
Blink ⚒️ |
✅ | ✅ | ❎ | |
Bloodin ⚒️ |
✅ | ✅ | ❎ | |
Coppelia ⚒️ 🎵 |
✅ | ✅ | ❎ |  |
Dee Jellie 🎵 |
❌ | ❌ | ☑️ | |
Discrete 🎵 |
❌ | ✅ | ☑️ | |
Feishin ⚒️ 🎵 |
✅ | ✅ | ❎ | |
Finer 🎵 |
❌ | ✅ | ❎ | |
| Fladder | ✅ | ✅ | ❎ | |
Foxy 🎵 |
✅ | ✅ | ❎ | |
| HamHub | ❌ | ✅ | ❎ | |
| Infuse | ❌ | ✅ | ☑️ | |
| iPlay | ✅ | ✅ | ❎ | |
Jelly Music App 🎵 |
✅ | ✅ | ❎ | |
Jellyfin Media Player 🔹 |
✅ | ✅ | ❎ | |
Jellyfin MPV Shim 🔹 |
✅ | ✅ | ❎ | |
| Jellyflix | ✅ | ✅ | ❎ | |
| Moonfin | ✅ | ✅ | ❎ | |
| Phyn | ❌ | ✅ | ☑️ | |
| Playtorrio | ✅ | ✅ | ❎ | |
| SenPlayer | ❌ | ✅ | ☑️ | |
Sonixd ⚒️ 🎵 |
✅ | ✅ | ❎ | |
Supersonic ⚒️ 🎵 |
✅ | ✅ | ❎ | |
Switchfin ⚒️ |
✅ | ✅ | ❎ | |
| VidHub | ❌ | ✅ | ☑️ | |
Linux
| Name | OSS | Free | Paid | Downloads |
|---|---|---|---|---|
ampcast ⚒️ 🎵 |
✅ | ✅ | ❎ | |
Blink ⚒️ |
✅ | ✅ | ❎ | |
Bloodin ⚒️ |
✅ | ✅ | ❎ | |
Coppelia ⚒️ 🎵 |
✅ | ✅ | ❎ | |
Delfin ⚒️ |
✅ | ✅ | ❎ |  |
Feishin ⚒️ 🎵 |
✅ | ✅ | ❎ | |
| Fladder | ✅ | ✅ | ❎ | |
Foxy 🎵 |
✅ | ✅ | ❎ | |
Gelly ⚒️ 🎵 |
✅ | ✅ | ❎ |   |
Jelly Music App 🎵 |
✅ | ✅ | ❎ | |
Jellyamp 🎵 |
✅ | ✅ | ❎ | |
Jellyfin Media Player 🔹 |
✅ | ✅ | ❎ | |
Jellyfin MPV Shim 🔹 |
✅ | ✅ | ❎ | |
| Jellyflix | ✅ | ✅ | ❎ | |
| Moonfin | ✅ | ✅ | ❎ | |
| Playtorrio | ✅ | ✅ | ❎ | |
Preserve ⚒️ 🎵 |
✅ | ✅ | ❎ | |
Sonixd ⚒️ 🎵 |
✅ | ✅ | ❎ | |
Supersonic ⚒️ 🎵 |
✅ | ✅ | ❎ | |
Switchfin ⚒️ |
✅ | ✅ | ❎ | |
Tauon Music Box 🎵 |
✅ | ✅ | ❎ | |
tsukimi ⚒️ |
✅ | ✅ | ❎ | |
📱 Mobile
iOS
| Name | OSS | Free | Paid | Downloads |
|---|---|---|---|---|
Coppelia ⚒️ 🎵 |
✅ | ✅ | ❎ | |
Dee Jellie 🎵 |
❌ | ❌ | ☑️ | |
Discrete 🎵 |
❌ | ✅ | ☑️ | |
| Filebar | ❌ | ✅ | ☑️ | |
Finamp 🎵 |
✅ | ✅ | ❎ | |
Finer 🎵 |
❌ | ✅ | ❎ | |
Fintunes 🎵 |
✅ | ✅ | ❎ |   |
| Fladder | ✅ | ✅ | ❎ | |
| HamHub | ❌ | ✅ | ❎ | |
| Infuse | ❌ | ✅ | ☑️ | |
| iPlay | ✅ | ✅ | ❎ | |
Jellify 🎵 |
✅ | ✅ | ❎ |   |
JellyBook 📖 |
✅ | ✅ | ❎ |   |
Jellyfin Mobile for iOS 🔹 |
✅ | ✅ | ❎ | |
| Jellyflix | ✅ | ✅ | ❎ | |
| JellyTV | ❌ | ❌ | ☑️ | |
Manet 🎵 |
❌ | ✅ | ❎ | |
| Moonfin | ✅ | ✅ | ❎ | |
| Phyn | ❌ | ✅ | ☑️ | |
Plappa 🎵 |
✅ | ✅ | ❎ | |
| SenPlayer | ❌ | ✅ | ☑️ | |
| Streamyfin | ✅ | ✅ | ❎ |  |
| Sunkfin | ✅ | ✅ | ❎ | |
Swiftfin 🔹 ⚒️ |
✅ | ✅ | ❎ | |
| VidHub | ❌ | ✅ | ☑️ | |
| yybx | ❌ | ❌ | ☑️ | |
Android
| Name | OSS | Free | Paid | Downloads |
|---|---|---|---|---|
AFinity ⚒️ |
✅ | ✅ | ❎ |  |
| AfuseKt | ❌ | ✅ | ☑️ |  |
Coppelia ⚒️ 🎵 |
✅ | ✅ | ❎ | |
Finamp 🎵 |
✅ | ✅ | ❎ | |
Findroid ⚒️ |
✅ | ✅ | ❎ | |
Fintunes 🎵 |
✅ | ✅ | ❎ | |
| Fladder | ✅ | ✅ | ❎ | |
Gelli 🎵 |
✅ | ✅ | ❎ |  |
| Ghosten-Player | ✅ | ✅ | ❎ |  |
| Hills | ❌ | ✅ | ☑️ | |
Jellify 🎵 |
✅ | ✅ | ❎ | |
JellyBook 📖 |
✅ | ✅ | ❎ | |
| JellyCine | ✅ | ✅ | ❎ |  |
Jellyfin for Android 🔹 |
✅ | ✅ | ❎ | |
| Jellyflix | ✅ | ✅ | ❎ | |
| Moonfin | ✅ | ✅ | ❎ | |
| Phyn | ❌ | ✅ | ☑️ | |
| Playtorrio | ✅ | ✅ | ❎ | |
| Reefin | ❌ | ❌ | ❎ |  |
| Streamyfin | ✅ | ✅ | ❎ | |
Symfonium ⚒️ 🎵 |
❌ | ❌ | ☑️ | |
| VidHub | ❌ | ✅ | ☑️ | |
Void ⚒️ |
✅ | ✅ | ❎ |   |
| Yamby | ❌ | ✅ | ☑️ | |
Sailfish OS
| Name | OSS | Free | Paid | Downloads |
|---|---|---|---|---|
| Sailfin | ✅ | ✅ | ❎ |  |
HarmonyOS
| Name | OSS | Free | Paid | Downloads |
|---|---|---|---|---|
FinMusic 🎵 |
✅ | ✅ | ❎ |   |
| FinVideo | ✅ | ✅ | ❎ |  |
Nintendo Switch
| Name | OSS | Free | Paid | Downloads |
|---|---|---|---|---|
Switchfin ⚒️ |
✅ | ✅ | ❎ | |
📺 TV
Apple TV
| Name | OSS | Free | Paid | Downloads |
|---|---|---|---|---|
Dee Jellie 🎵 |
❌ | ❌ | ☑️ | |
| Filebar | ❌ | ✅ | ☑️ | |
| HamHub | ❌ | ✅ | ❎ | |
| Infuse | ❌ | ✅ | ☑️ | |
| JellySee | ❌ | ❌ | ☑️ | |
| Mediora | ✅ | ✅ | ❎ | |
| Moonfin | ✅ | ✅ | ❎ | |
| MrMC | ✅ | ✅ | ☑️ | |
| SenPlayer | ❌ | ✅ | ☑️ | |
Swiftfin 🔹 ⚒️ |
✅ | ✅ | ❎ | |
| VidHub | ❌ | ✅ | ☑️ | |
| yybx | ❌ | ❌ | ☑️ | |
Android TV
| Name | OSS | Free | Paid | Downloads |
|---|---|---|---|---|
| AfuseKt TV | ❌ | ❌ | ☑️ |  |
DUNE ⚒️ |
✅ | ✅ | ❎ |  |
| Elefin | ✅ | ✅ | ❎ |  |
| Fladder | ✅ | ✅ | ❎ | |
| Ghosten-Player | ✅ | ✅ | ❎ | |
Jellyfin for Android TV 🔹 |
✅ | ✅ | ❎ | |
| Moonfin | ✅ | ✅ | ❎ | |
| Reefin | ❌ | ❌ | ❎ | |
| VidHub | ❌ | ✅ | ☑️ | |
Void ⚒️ |
✅ | ✅ | ❎ | |
| Wholphin | ✅ | ✅ | ❎ |  |
| Yamby | ❌ | ✅ | ☑️ | |
Kodi
| Name | OSS | Free | Paid | Downloads |
|---|---|---|---|---|
JellyCon 🔹 |
✅ | ✅ | ❎ |  |
Jellyfin for Kodi 🔹 |
✅ | ✅ | ❎ |  |
Roku
| Name | OSS | Free | Paid | Downloads |
|---|---|---|---|---|
Jellyfin for Roku 🔹 |
✅ | ✅ | ❎ |  |
| JellyRock | ✅ | ✅ | ❎ |  |
| Moonfin | ✅ | ✅ | ❎ | |
Tizen
| Name | OSS | Free | Paid | Downloads |
|---|---|---|---|---|
Jellyfin for Tizen 🔹 |
✅ | ✅ | ❎ | Build It Yourself |
| Litefin | ✅ | ✅ | ❎ |  |
| Moonfin | ✅ | ✅ | ❎ | |
webOS
| Name | OSS | Free | Paid | Downloads |
|---|---|---|---|---|
Breezyfin ⚒️ |
✅ | ✅ | ❎ |  |
Jellyfin for WebOS 🔹 |
✅ | ✅ | ❎ |  |
| Litefin | ✅ | ✅ | ❎ | |
| Moonfin | ✅ | ✅ | ❎ | |
By Type
🎵 Music Client
| Name | OSS | Free | Paid | Downloads |
|---|---|---|---|---|
ampcast ⚒️ 🎵 |
✅ | ✅ | ❎ | |
Coppelia ⚒️ 🎵 |
✅ | ✅ | ❎ | |
Dee Jellie 🎵 |
❌ | ❌ | ☑️ | |
Discrete 🎵 |
❌ | ✅ | ☑️ | |
Feishin ⚒️ 🎵 |
✅ | ✅ | ❎ | |
Finamp 🎵 |
✅ | ✅ | ❎ | |
Finer 🎵 |
❌ | ✅ | ❎ | |
FinMusic 🎵 |
✅ | ✅ | ❎ | |
Fintunes 🎵 |
✅ | ✅ | ❎ | |
Foxy 🎵 |
✅ | ✅ | ❎ | |
Gelli 🎵 |
✅ | ✅ | ❎ | |
Gelly ⚒️ 🎵 |
✅ | ✅ | ❎ | |
Jellify 🎵 |
✅ | ✅ | ❎ | |
Jelly Music App 🎵 |
✅ | ✅ | ❎ | |
Jellyamp 🎵 |
✅ | ✅ | ❎ | |
Manet 🎵 |
❌ | ✅ | ❎ | |
Plappa 🎵 |
✅ | ✅ | ❎ | |
Preserve ⚒️ 🎵 |
✅ | ✅ | ❎ | |
Sonixd ⚒️ 🎵 |
✅ | ✅ | ❎ | |
sonixd ⚒️ 🎵 |
✅ | ✅ | ❎ | |
Supersonic ⚒️ 🎵 |
✅ | ✅ | ❎ | |
Symfonium ⚒️ 🎵 |
❌ | ❌ | ☑️ | |
Tauon Music Box 🎵 |
✅ | ✅ | ❎ | |
📖 Reader
| Name | OSS | Free | Paid | Downloads |
|---|---|---|---|---|
JellyBook 📖 |
✅ | ✅ | ❎ | |
- Official
🔹 - Beta
⚒️ - Music Client
🎵 - Reader
📖
[!NOTE] Please note that this Markdown file is automatically generated from the
clients.yamlfile. Contributions should only be made by updating theclients.yamlfile. Any updates to the.yamlfile will result in this Markdown file being re-generated to reflect those changes.
14. Jellyfin Themes
List of Jellyfin Themes'
ElegantFin: https://lscambo13.github.io/ElegantFin/
CSS:
@import url("https://cdn.jsdelivr.net/gh/lscambo13/ElegantFin@main/Theme/ElegantFin-jellyfin-theme-build-latest-minified.css");15. Jellyfin Plugins

A List of Awesome Jellyfin Themes and Plugins
[ Plugins • Companion Apps & Tools • Guides • Snippets • Related • Contribute ]
🖌️ ThemesBrowse the collection of community themes |
📺 ClientsBrowse available clients for all platforms |
|---|
🧩 Plugins
🎨 UI & Customization
- HoverTrailer - Displays movie trailers on hover.
- InPlayerEpisodePreview - Adds an episode list to the video player.
- jellyfin-editors-choice-plugin - Adds a Netflix-style, full-width content slider to the home page to feature selected content.
- Jellyfin-Enhanced - Adds keyboard shortcuts, subtitle styling, TMDB reviews, Jellyseerr search and request integration, and other improvements to Jellyfin.
- jellyfin-icon-metadata - Adds metadata provider icons to Jellyfin.
- Jellyfin-JavaScript-Injector - Injects custom JavaScript into the Jellyfin UI without modifying index.html.
- Jellyfin-MonWUI-Plugin - UI enhancement toolkit for Jellyfin providing customizable sliders, hover trailers, a music player, notifications, and other interface modules.
- Jellyfin.Plugin.ActorPlus - Adds additional details and hoverable filmography to actor portraits and displays actor lists when hovering over movie or series posters.
- jellyfin-plugin-collection-sections - Adds additional sections to
jellyfin-plugin-home-sectionsfor collections and playlists. - jellyfin-plugin-custom-tabs - Adds personalized tabs in jellyfin-web for quick access to custom content.
- jellyfin-plugin-GetAvatar - Allows users to choose an avatar from a collection of images.
- jellyfin-plugin-home-sections - Allows users to customize the jellyfin-web home screen with dynamic sections like "Because You Watched" and "Latest Movies".
- jellyfin-plugin-media-bar - A Featured Content Bar to showcase your media collection.
- jellyfin-plugin-pages - Enables other plugins to create custom Jellyfin pages that match the native UI.
- jellyfin-plugin-ratings - Adds user ratings, card overlays, media requests, deletion workflows, chat, and new media notifications to Jellyfin.
- jellyfin-plugin-skin-manager - Helps you to download and install skins.
- Jellyfin-Seasonals - Collections of seasonal themes and animations for Jellyfin.
- jellyscrub - Smooth mouse-over video scrubbing previews.
🔸 Stale- NOTE: Jellyfin 10.9 now natively supports trickplay.
- Static Assets - Upload and serve static assets such as CSS, JavaScript, and images directly from Jellyfin.
🔸 Stale
📂 Collections & Playlists
- jellyfin-favorited-songs-playlist - Automatically creates and updates a "Favorited Songs" playlist containing all your favorited music tracks.
- jellyfin-plugin-auto-collections - Automatically creates and maintains dynamic collections based on flexible criteria.
- jellyfin-plugin-collection-import - Creates and sorts collections by importing from external sources like mdblist.
- jellyfin-plugin-provider-stuff - Automates tagging library items with streaming provider tags, creates collections per provider.
🔸 Stale - Jellyfin-Roulette - Adds a roulette feature that plays a random entry from a playlist.
- jellyfin-smartlists-plugin - Creates dynamic collections and playlists in Jellyfin that automatically update based on customizable rules as the library changes.
- playlist-generator - Creates personal playlists based on your listening history.
- TheDwarfsHammer - Enhanced collection management and content discovery for Jellyfin.
▶️ Playback
- intro-skipper - Fingerprint audio to automatically detect intro and outro segments in Jellyfin.
- jellyfin-plugin-cinemamode - Enables Jellyfin's Cinema Mode with local trailers and pre-rolls.
- jellyfin-plugin-discontinue-watching - Lets you remove items from the Continue Watching list without resetting watch progress, with optional auto-hide after inactivity.
- jellyfin-plugin-jellysleep - Adds sleep timer functionality to Jellyfin.
- Jellyfin.Plugin.StreamLimit - Allows limiting the number of simultaneous streams per user.
- jellyfin-transcode-nag - Nags users when they're transcoding due to unsupported formats or codecs, while allowing bitrate-based transcoding.
🔗 Integration & Sync
- Gelato - Replaces Jellyfin's default search with Stremio-powered results and can automatically import entire catalogs into your library through scheduled tasks.
- jellyfin-ani-sync - Automatically tracks and synchronizes anime watching progress between Jellyfin and Anilist and other services.
- jellyfin-plugin-animethemes - Fetches anime opening and ending themes from AnimeThemes.moe, supporting both audio and video.
- Jellyfin.Plugin.JF_To_Stash_Sync - Synchronizes viewing activity with Stash.
- jellyfin-plugin-letterboxd-sync - Automatically syncs your watched movie history with Letterboxd.
- jellyfin-plugin-listenbrainz - Automatically syncs your music activity with ListenBrainz.
- jellyfin-plugin-streamyfin - Companion plugin for Streamyfin which allows for a centralized configuration of the Streamyfin application.
- jellyfin-rpc by kennethsible - Displays your current Jellyfin activity directly on Discord.
- jellyfin-rpc by Radiicall - Displays your current Jellyfin activity directly on Discord.
- jellynext - Creates per-user virtual libraries for personalized Trakt recommendations and new seasons.
- Moonbase - Companion plugin for Moonfin clients, providing server-side settings sync, integrations, and a hosted Moonfin Web interface.
- MyAnimeSync - Automatically synchronizes anime watching progress between Jellyfin and MyAnimeList.
- Plexyfin - Automatically synchronizes artwork and collections from Plex to Jellyfin.
- Shokofin - Integrates Shoko Server with Jellyfin for anime library management.
🔔 Notifications
🔐 Authentication
- jellyfin-plugin-ldapauth - Allows the use of LDAP as an auth provider.
- jellyfin-plugin-sso - Allows users to sign in through an SSO provider.
🔹 Beta - Jellyfin Security - Natively adds TOTP and email 2FA, passkeys, OIDC/SSO sign-in, brute-force protection, IP allowlists, device pairing, trusted browsers, and audit logging to Jellyfin.
- TeleJelly - Allows users to sign in through the Telegram Login Widget.
📚 Library Management
- AniLiberty STRM Plugin - Generates AniLiberty STRM libraries for Jellyfin with metadata, intro markers, and watch-progress sync.
- Jellyfin Ignore - Ignores filename patterns on library scans.
🔹 Beta🔸 Stale - jellyfin-local-posters - Automatically matches and imports local posters using TPDb and MediUX filename formats. Also supports syncing posters from Google Drive.
- jellyfin-musictags-plugin - Automatically extracts audio file metadata and converts it into standard Jellyfin tags.
- jellyfin-plugin-air-times - Provides localized series air times based on server location.
🔸 Stale - jellyfin-plugin-enigma2 - Supports Vu+ & Enigma2 live TV streamers.
🔸 Stale - jellyfin-plugin-languageTags - Adds language tags to media based on audio tracks using FFmpeg.
- jellyfin-plugin-localrecs - Generates personalized movie and TV recommendations based on local watch history without external services required.
- jellyfin-plugin-media-cleaner - Automatically removes played media after a specified time period.
- jellyfin-plugin-MediathekViewDL - Integrates MediathekViewDL into Jellyfin and allows users to search, download, and manage content.
- jellyfin-plugin-meilisearch - Enhances Jellyfin search speed and accuracy by offloading queries to a Meilisearch instance.
- jellyfin-powertoys - A collection of plugins to enhance Jellyfin with additional features and tools.
- JellyfinTweaks - Overrides Jellyfin settings such as Enable Backdrops and Enable Theme Music across all devices.
- Jellyfin-Xtream-Library - Syncs Xtream VOD and Series content to native Jellyfin libraries via STRM files, with automatic metadata lookup and Live TV support.
- JellySTRMprobe - Probes STRM files to extract media information (codec, resolution, duration, audio) that Jellyfin skips during library scans.
- media-upload-plugin - Media-manager that provides uploads, bulk downloads from URLs, and directory browsing within Jellyfin.
🔸 Stale - quality-gate - Restrict users to specific media versions based on configurable path-based policies, useful for bandwidth management or tiered access.
- smart-covers - Cover extraction for books, audiobooks, comics, magazines, and music libraries with online fallback via Open Library & Google Books.
- whisper-subs - Automatically generates subtitles using local AI models powered by Whisper, with all processing on your server.
🏷️ Metadata Providers
- jellyfin-imdb-rating-updater - Downloads the IMDb ratings dataset daily and updates the CommunityRating field for library items with an IMDb ID without modifying other metadata.
- jellyfin-plugin-AnimeMultiSource - Aggregates anime metadata, tags, artwork, and people from multiple sources (AniList, AniDB, MAL/Jikan, TVDB, Fanart.tv) with rate limiting and persistent caching for large libraries.
- jellyfin-plugin-applemusic - Fetches album and artist metadata from Apple Music.
- Jellyfin.Plugin.ArtworkMultiSource - Combines posters and logos from TMDb and TVDB with language-aware priority and configurable sorting.
- jellyfin-plugin-hikka - Metadata and images for anime and manga from the Hikka website.
- jellyfin-plugin-kinopoisk - Metadata provider for Kinopoisk.
- Jellyfin.Plugin.MDBList_Ratings - Retrieves ratings from MDBList using TMDb IDs and integrates them into Jellyfin's rating fields, with optional UI enhancements to display ratings from multiple sources.
- jellyfin-plugin-myanimelist - Provides MyAnimeList metadata for anime.
- jellyfin-plugin-onepace - Provides metadata and cover art for the One Pace project.
- Jellyfin Plugin PhoenixAdult - Metadata provider for adult content from multiple sites.
🔸 Stale - jellyfin-plugin-shikimori - Metadata provider for shikimori.one.
- Jellyfin Plugin Stash - Metadata provider for Stash.
- Jellyfin Plugin ThePornDB - Metadata provider for ThePornDB.
- jellyfin-youtube-metadata-plugin - Provides metadata for YouTube content.
👾 Companion Apps & Tools
🖼️ Artwork & Posters
- aphrodite - Enhances media library posters with quality indicators like resolution, audio codec, and review ratings.
🔸 Stale - CoverMaker - Allows designing and generating custom cover images for your media collections.
- Jellyfin-Cover-Maker - Website for creating consistent covers and posters for Jellyfin libraries.
- Jellyfin-Image-Exporter - Exports images (posters, banners, thumbnails) from Jellyfin metadata.
- jellyfin-poster-hrd-logo - Automatically downloads covers for HDR movies from TMDb and applies an HDR logo in the top-right corner.
🔸 Stale - jellyfin_ratings - Replaces Jellyfin ratings with ratings from various sources (IMDb, Trakt, Letterboxd, and others).
- jellyfin-tools - Generates images with Jellyfin-like styling such as shadow overlays and library title text.
🔸 Stale - Jellyfin Update Poster - Batch imports cover images from ThePosterDB and MediUX, with set downloading support for MediUX.
- jellytools - CLI tool for synchronizing artwork and collections from Plex to Jellyfin and generating animated library card videos.
🔸 Stale - pixelfin - Inspects Jellyfin libraries for missing, present, or low-resolution images with export support.
- Posterizarr - Automates poster, background, and title card creation for Plex, Jellyfin, and Emby with customizable overlays.
- TitleCardMaker - Automated title card maker for Plex, Jellyfin, and Emby.
🔍 Media Requests & Discovery
- Anchorr - Discord bot for Jellyfin media requests and new content notifications.
- AudioBookRequest - Request management tool for audiobooks on Plex, Jellyfin, and Audiobookshelf.
- content-recommender - Suggests movies or TV shows from your library based on watch history.
- jellyfin-updoot - Adds thumbs-up recommendations, per-item comments, and a "recommended by users" page.
- jellyseerr - Request management and media discovery tool for Jellyfin, Plex, and Emby.
- List-Sync - Automatically import movies and TV shows from IMDB or Trakt lists into Jellyseerr.
🔹 Beta - reiverr - Combined interface for Jellyfin, TMDB, Radarr, and Sonarr.
🔹 Beta - scenepeek-android - An Android app that provides detailed movie and TV show information with TMDB and Jellyseerr integration.
- SuggestArr - Automatically request suggested movies and TV shows to Jellyseerr based on recently watched.
- swiparr - Swipe through your library, match with friends in a session, and find something everyone wants to watch.
- whatseerr - WhatsApp bot for Seerr that allows users to search and request media via WhatsApp messages.
📊 Statistics & Watch History
- jellyfin-rewind - A Spotify Wrapped-like experience for Jellyfin music listeners.
- jellyfin-watch-updater - Updates
lastPlayedDatefor watched items when clients fail to set it, enabling tools such as media cleanup plugins to correctly detect watched media. - JellyPlex-Watched - Syncs watch history between Jellyfin, Plex, and Emby Servers.
- Jellystat - Statistics and analytics dashboard for Jellyfin.
- jelly-watch-wise - Monitors and enforces Jellyfin watch time limits per user, with API integration and a simple GUI.
🔸 Stale - streamystats - Statistics service for Jellyfin, providing analytics and data visualization.
- watchstate - Syncs play state between different media servers.
👥 User Management
- Jellycord - Discord companion bot for managing JFA-GO instances.
🔸 Stale - jellyfin-telegram-channel-sync - Syncs Jellyfin user access with Telegram channel membership, automatically disabling accounts when members leave.
- jfa-go - User- / Invite-Management system for Jellyfin.
- jf-avatars - Allows users to select avatars from an image gallery.
- wizarr - Advanced user invitation and management system.
📁 Media Organization
- CineSync - Python-based library management tool for organizing debrid and local libraries without Sonarr or Radarr.
- Fixarr - Cross-platform media renaming and backup tool.
🔹 Beta - JellyCC - Command-line tool that audits, repairs and optimizes media to ensure Direct Play on Jellyfin.
- Jellyfin-Auto-Collections - A tool to automatically make and update collections based on internet lists such as IMDb and Letterboxd.
- JellyfinEasyMetadataManager - Desktop tool for managing and editing metadata in Jellyfin libraries.
- jellyfinmanager - Command-line tool for managing Jellyfin watched status with backup/restore capabilities and missing episode detection using TVDB.
- jellysweep - Automatically removes old, unwatched movies and TV shows by analyzing viewing history and user requests.
- mnamer - Customizable tool to automatically rename and organize media files.
- Multi-User Media Cleaner - Query and delete unwanted media content from your Jellyfin server.
- Squishy - Transcode and download your Jellyfin media with fully customizable presets and hardware acceleration.
💬 Subtitles
- bazarr-jellyfin - Search and download subtitles directly from Jellyfin's native subtitle UI using your Bazarr instance.
- OpenSubtitlesDownload - Automatically or manually downloads subtitles using CLI/Gnome/KDE.
- subgen - Autogenerate subtitles using OpenAI Whisper Model via Jellyfin.
🎵 Music
- AudioMuse-AI - Uses sonic analysis and AI-powered clustering to create tempo and mood-based playlists via the Jellyfin API.
- jellyfin-theme-music-manager - Web application for managing theme songs and backdrop videos for Jellyfin libraries.
- jellyplist - Utility for syncing Spotify playlists to Jellyfin.
🔹 Beta - JellyTunes - Sync your Jellyfin music library to any USB drive or SD card — with optional FLAC to MP3 conversion.
- MusicBrainz-UserScripts - One-click importing of album from Jellyfin into MusicBrainz.
- Playlifin - Converts YouTube Music playlists to Jellyfin playlists.
📥 Content Import
- calibre2jellyfin - Python script to construct a Jellyfin ebook library from a Calibre library.
- trailarr - Manages trailer downloads for your Radarr and Sonarr libraries.
- trailerfin - Automatically retrieves and creates STRM links to IMDb trailers and places them in the backdrops folder to view trailers on the details page.
- ytdlp2STRM - Streams YouTube, Twitch and more via yt-dlp to Jellyfin.
- ytdl-sub - Automates downloading and metadata generation with yt-dlp.
🔧 Server Administration
- ADRG - Dynamic Docker resource governor using cgroups v2 to throttle background tasks during media activity.
- autopulse - Lightweight automation service that updates Plex, Jellyfin, and Emby libraries based on notifications from media organizers like Sonarr and Radarr.
- autoscan - Replaces the default Plex and Emby behaviour for picking up changes on the file system.
🔸 Stale - Cloud Seeder - One-click installer and maintainer for Jellyfin on Windows, macOS, and Linux.
- declarative-jellyfin - Declarative configuration of your Jellyfin server on NixOS.
🔹 Beta - jellyfin-encoder - Docker-based automatic 720p HEVC/AV1 transcoding service for Jellyfin libraries with NVIDIA and Intel hardware acceleration.
- jellyhub - Indexes media from multiple Jellyfin servers into a single searchable hub.
- Jellyman - CLI tool for installing, managing, and updating Jellyfin on Linux.
- JellyRoller - A CLI Jellyfin Controller.
🔹 Beta - JellySearch - A fast full-text search proxy for Jellyfin using Meilisearch.
- Jellyswarrm - Reverse proxy that lets you combine multiple Jellyfin servers into one virtual instance.
- Samsung-Jellyfin-Installer - Cross-platform tool that helps you install Jellyfin on Samsung Smart TVs running Tizen OS.
- Universal Plugin Repo - Consolidates many plugin repositories to create a universal catalogue.
- xsrv.jellyfin - Ansible role to deploy and configure Jellyfin.
🧰 Miscellaneous
- embyToLocalPlayer - Lets you watch videos from Jellyfin using a local video player (like VLC and MPV) and syncs watch progress back.
- jelly-clipper - Web application for creating, sharing, and managing video clips from Jellyfin libraries.
🔹 Beta - Jellyfin Episodes Ratings Grid - Show IMDb episode ratings in a heatmap-style grid on Jellyfin series pages.
- jellyfin-mods - Collection of modifications and customizations for personalizing Jellyfin.
- Jellyfin Notification System - Sends Telegram notifications with media images whenever a new movie, series, season, or episode is added to Jellyfin.
🔸 Stale - Jellyfin Segment Editor - Manage Jellyfin Media Segment positions.
- KefinTweaks - Collection of UI enhancements and customization tweaks for Jellyfin.
- MPC-JF - Launch external media players (MPC-HC, MPC-BE, PotPlayer) from Jellyfin Web or Jellyfin Media Player.
- Scyphomote - A dedicated remote control for Jellyfin with support for playback transparency, trickplay previews, and more.
- tunarr - Create custom live TV channels from your Plex or Jellyfin library with a web UI and IPTV support.
📜 Snippets
- snippets/language-overlay - A script to add flags to movie posters.
📖 Guides
- jellyfin-on-macos - Guide for hosting Jellyfin on macOS with dynamic DNS, geo-filtering, and monitoring dashboards.
🌌 Related
This section includes software, guides and tools that are not specifically designed to work with Jellyfin, but can be useful for tasks related to media management or to enhance Jellyfin's functionality.
- Dispatcharr - Self-hosted M3U proxy with IPTV, EPG, and VOD management support.
- ErsatzTV - Stream custom live channels using your own media.
🔹 Beta - Explo - Automated music discovery tool that recommends tracks based on your listening history.
- locatarr - A list of tools used to automate the downloading and organization of media files.
- MediaTracker - Media tracker and user rating platform with Jellyfin integration.
- Movary - Media tracker and user rating platform.
🔹 Beta - Multi Scrobbler - Scrobbles music from many sources to many clients.
🔹 Beta - Quasarr - Emulates a usenet indexer and download client to allow direct downloads with sonarr/radarr.
- rffmpeg - A remote FFmpeg wrapper, commonly used for transcoding media on more capable machines.
- speedrr - Change your torrent client's upload speed dynamically, on certain events such as when a Plex/Jellyfin stream starts.
- Threadfin - M3U proxy for Jellyfin (Based on xTeVe).
- TRaSH Guides - Easy-to-understand guides for Sonarr, Radarr, and Bazarr, along with related tools.
Communities
This section contains links to communities which focus on Jellyfin or related topics.
- Jellyfin Discord - The official Jellyfin Discord server.
🔰 Official - Jellyfin Forum - The official Jellyfin forum.
🔰 Official - Jellyfin Matrix - The official Jellyfin Matrix server.
🔰 Official - r/Jellyfin - The official Jellyfin subreddit.
🔰 Official - r/JellyfinCommunity - An independent, community-run subreddit.
- JellyfinCommunity Discord - An independent, community-run Discord server.
Contribute
Contributions welcome! But please read the contribution guidelines first. You can also create a new issue.
16. Jellyfin Enhanced
Reboot: It is important that after installing Jellyfin Enhanced that you reboot the whole Jellyfin stack. Just a simple reboot from the dashboard screen won't work. Hence, go to Dockhand and reboot the whole stack, from the cli or any other docker configuration software that you are using. After the reboot you will notice that at least a random item button will appear in the right top corner