1. Ente Photos
Ente unlike Immich and Photoprism is an E2EE private media application. This makes it stand out, since it allows you to store your private media on your friends/families server without worrying that your friend has access to your media. On top of that Ente also uses machine learning locally on each device the app is installed on. Finally, it allows for social graphs s.t your friends and family can share albums and comments and likes on your media.
- E2EE = Yes
- Authentication: Password, 2FA
- Admin Metadata Access: Access to social graph i.e who you share albums with
- Website: ente.com
- Repository: Github
- Installation Documentation: Docker Deployment
- Installation Videos: Jim's Garage
- Community: Discord, Github Discussions
- Donations: Ente does not work with donations to support the project. Instead it has paid hosted plans. To become truly global we hope to see a donation funding method in the future as other open source projects.
- Terms and conditions for hosted plan: Terms and conditions
- 1. Installation
- 2. Ente Clients
- 3. Public Albums
- 8. Streamable Videos
- 9. Migrate from MinIO to Open source S3 Bucket
- 10. Contacts
- 11. Archiving Albums
- 4. Video Editing and Thumbnails
- 12. Ente Legacy
- 13. Ente vs Immich vs Photoprism
1. Installation
Source: Ente Docker Installation
If you don't have enough resources you can install Ente on your DockerVM. However, if you do, then I would recommend to make a dedicated VM for your precious personal media, especially when it will also include media from your friends and family. But yeah, regardless the installation will be the same if you will use docker. Now, if you use Dockhand and create a new VM specifically for personal media then you should create another dockhand instance for that. Yes you can
1. So the first thing we will do is download all the files we need s.t we can then copy paste them in Dockhand. For this enter your VM and copy paste the following in the folder where Dockhand has access to.
git clone https://github.com/ente/ente
cd ente/server/config
2. Perfect, so now you are in the config file which contains the compose file, environment variables and the museum file. This is basically where the magic happens. So to make them effective we need to change there names as follows
# Inside the cloned repository's directory (usually `ente`)
cd server/config
cp example.env .env
cp example.yaml museum.yaml
3. Perfect now, we will start editing first the .env file. which at the moment of writing looks like this
.env
# Copy this file to .env in the same directory in which this file is present
# This file contains the environment variables needed for Ente's cluster to run properly.
# This file is split based on services declared in Docker Compose file
#
# Service: Postgres
# This is used for storing data in database pertaining to collections, files, users, subscriptions, etc.
# These credentials are needed for accessing the database via Museum.
# Please set a strong password for accessing the database.
# Enter these values in museum.yaml file under `db`.
# This need not be defined if using external DB (i. e. no Compose service for PostgreSQL is used)
POSTGRES_USER=pguser
POSTGRES_PASSWORD=<password>
POSTGRES_DB=ente_db

# Service: MinIO
# This is used for MinIO object storage service that's shipped by default with the compose file
# to reduce need for an external S3-compatible bucket for quick testing.
# It is recommended to use an external bucket for long-term usage.
# The credentials required for accessing the object storage is documented below.
# It is not needed to configure these variables if you are using an external bucket
# Enter the user value into key and password in secret for buckets in museum.yaml under `s3` section.
MINIO_ROOT_USER=minio-user
MINIO_ROOT_PASSWORD=password

# Service: Web
# Replace this with the API endpoint for Museum.
ENTE_API_ORIGIN=http://localhost:8080
4. They basically want you to create the following credentials for Postgres and for Minio
| POSTGRES_USER | pguser |
| POSTGRES_PASSWORD | password |
| POSTGRES_DB | ente_db |
| MINIO_ROOT_USER | minio-user |
| MINIO_ROOT_PASSWORD | password |
| ENTE_API_ORIGIN | https://api-ente.example.org |
5. Now, to make it easy you can generate some random passwords for Postgres and MinIo with the following commands
openssl rand -base64 32  # For Postgres Password
openssl rand -base64 32  # For MinIo Password
6. Then copy and paste these for the Postgres and MinIo passwords. Also the username you can adjust as well to make your instance even more secure as well.
7. Finally, the ENTE_API_ORIGIN value should be a publicly accessible domain which will be used as your connection point when you launch Ente applications. This is both for the App, Desktop and Web app. If your base domain is example.org you could make it simple and use api-ente.example.org for instance. Note! This is not the URL you use in your browser to access your Ente instance! We will set that value later.
8. Next we will enter the compose file and do a couple of small adjustments. Basically, we want to add the postgres and minio data volumes to be added in the same ente directory. I simply prefer to keep all data under neath one folder. To do this just add ./ in front of the volumes and remove the volumes at the bottom. Then it looks something like this
compose.yml
services:
  museum:
    build:
      context: ..
    ports:
      - 8080:8080 # Museum/API
    depends_on:
      postgres:
        condition: service_healthy
    env_file:
      - .env
    volumes:
      - ./museum.yaml:/museum.yaml:ro
      - ./data:/data:ro

  # Resolve "localhost:3200" in the museum container to the minio container.
  socat:
    image: alpine/socat
    network_mode: service:museum
    depends_on: [museum]
    command: "TCP-LISTEN:3200,fork,reuseaddr TCP:minio:3200"

  postgres:
    image: postgres:15-trixie
    env_file:
      - .env
    # Wait for postgres to accept connections before starting museum.
    healthcheck:
      test: pg_isready -q -d ${POSTGRES_DB} -U ${POSTGRES_USER}
      start_period: 30s
      start_interval: 1s
    volumes:
      - ./postgres-data:/var/lib/postgresql/data

  minio:
    image: minio/minio
    ports:
      - 3200:3200 # MinIO API
      # - 3201:3201 # MinIO Console (uncomment to access externally)
    env_file:
      - .env
    command: server /data --address ":3200" --console-address ":3201"
    volumes:
      - ./minio-data:/data
    post_start:
      - command: |
          sh -c '
          #!/bin/sh

          while ! mc alias set h0 http://minio:3200 ${MINIO_ROOT_USER} ${MINIO_ROOT_PASSWORD} 2>/dev/null
          do
            echo "Waiting for minio..."
            sleep 0.5
          done

          cd /data

          mc mb -p b2-eu-cen
          mc mb -p wasabi-eu-central-2-v3
          mc mb -p scw-eu-fr-v3
          '

  ente-web:
    build:
      context: ../..
      dockerfile: web/Dockerfile
    ports:
    ports:
      - 3000:3000 # Photos web app
      - 3001:3001 # Accounts
      - 3002:3002 # Public albums
      - 3003:3003 # Auth
      - 3004:3004 # Cast
      - 3005:3005 # Share
      - 3006:3006 # Embed
      - 3008:3008
      - 3009:3009
      - 3010:3010 # Memories
    # Modify these values to your custom subdomains, if using any
    environment:
      - NODE_ENV=development
    env_file:
      - .env

#volumes:
#  postgres-data:
#  minio-data:
9. Now, the minio-data folder will be the object storage where all the media is living. It is up to you if this will be local or external via an NFS share. Now, if you already have an minio-data object storage running somewhere then you can also connect to this as well. However, for this basic setup we assume that you don't have this setup yet and will generate a new MiniO object storage container. In the future I would like to add a RustFS container instead since MinIO stopped being open source in 2026 unfortunately.
10. Maybe now it is but at the moment of writing the restart policy was not defined in my compose file. I like that all my docker containers start after the VM is started s.t I don't need to manually do this. Hence, I will add the following line to each container
10. Now, that is all settled what is left is to configure the museum.yaml file, which looks like this
museum.yaml
# Copy this file to museum.yaml in the same directory in which this file is present

# This section is meant for configuration of database.
# Museum uses these values and credentials for connecting
# to the database.
# Set a strong password and if using PostgreSQL Docker container
# provided in Docker Compose file, ensure db.password is same
# as POSTGRES_PASSWORD
# Similarly ensure db.user and db.name are same as POSTGRES_USER and
# POSTGRES_DB respectively
db:
    host: postgres
    port: 5432
    name: ente_db
    user: pguser
    password: <password>

# This section is for configuring storage buckets. Omit this section if
# you only intend to use Ente Auth
s3:
    # Change this to false if enabling SSL
    are_local_buckets: true
    # Only path-style URL works if disabling are_local_buckets with MinIO
    use_path_style_urls: true
    b2-eu-cen:
      # Uncomment the below configuration to override the top-level configuration
      # are_local_buckets: true
      # use_path_style_urls: true
      key: <key>
      secret: <secret>
      endpoint: localhost:3200
      region: eu-central-2
      bucket: b2-eu-cen
    wasabi-eu-central-2-v3:
      # are_local_buckets: true
      # use_path_style_urls: true
      key: <key>
      secret: <secret>
      endpoint: localhost:3200
      region: eu-central-2
      bucket: wasabi-eu-central-2-v3
      compliance: false
    scw-eu-fr-v3:
      # are_local_buckets: true
      # use_path_style_urls: true
      key: <key>
      secret: <secret>
      endpoint: localhost:3200
      region: eu-central-2
      bucket: scw-eu-fr-v3

# Specify the base endpoints for various web apps
apps:
    # If you're running a self hosted instance and wish to serve public links,
    # set this to the URL where your albums web app is running.
    public-albums: http://localhost:3002
    # If you're running a self hosted instance and wish to serve public links
    # for locker, set this to the URL where your share web app is running.
    public-locker: http://localhost:3005
    # If you're running a self hosted instance and wish to serve Ente Paste,
    # set this to the URL where your paste web app is running.
    public-paste: http://localhost:3008
    # If you're running a self hosted instance and wish to serve public memory
    # shares, set this to the URL where your memories web app is running.
    public-memories: http://localhost:3010
    cast: http://localhost:3004
    embed-albums: http://localhost:3006
    # Set this to the URL where your accounts web app is running, primarily used for
    # passkey based 2FA.
    accounts: http://localhost:3001
    # Set this to the URL where your legacy recovery web app is running.
    legacy: http://localhost:3011

# Key used for encrypting customer emails before storing them in DB
#
# To make it easy to get started, some randomly generated (but fixed) values are
# provided here. But if you're really going to be using museum, please generate
# new keys. You can use `go run tools/gen-random-keys/main.go` for that.
#
# Replace values in key and JWT for security
key:
    encryption: yvmG/RnzKrbCb9L3mgsmoxXr9H7i2Z4qlbT0mL3ln4w=
    hash: KXYiG07wC7GIgvCSdg+WmyWdXDAn6XKYJtp/wkEU7x573+byBRAYtpTP0wwvi8i/4l37uicX1dVTUzwH3sLZyw==
# JWT secrets
jwt:
    secret: i2DecQmfGreG6q1vBj5tCokhlN41gcfS2cjOs9Po-u8=
11. Now, the first thing we need to do is change the encryption, hash and secret key. Just as with the postgres and minio passwords we will again generate them with
openssl rand -base64 32  # For encryption key
openssl rand -base64 64  # For hash key
openssl rand -base64 32  # For JWT secret
12. Then just replace them in the museum.yaml file for security reasons.
13. Perfect, now that's done we are almost there, we only need to add the domain names for all the different applications. Also since this app will be publicly accessible I would host the application on Cloudflare DNS. In this way you can use their proxy to prevent you from DDOS attacks and what not. Okey so as of writing you should create the following domain names and replace the http://localhost:port with your domain name. Don't forget to change HTTP ---> HTTPS !!!
| Domain Name | Port |
|
Your Ente Instance: https://ente.example.org |
3000 |
| 8080 | |
|
minio-storage: https://mino.example.org |
3200 |
| public-albums: https://albums.example.org | 3002 |
| public-locker: https://locker.example.org | 3005 |
| public-paste: https://paste.example.org | 3008 |
| public-memories: https://memories.example.org | 3010 |
| cast: https://cast.example.org | 3004 |
| embed-albums: https://embed.example.org | 3006 |
| accounts: https://accounts.example.org | 3001 |
| legacy: https://legacy.example.org | 3011 |
|
space: https://space.rfeyn.org |
3013 |
14. Now, to make this working you need to have your reverse proxy working of course. If you use OPNsense as your router with Caddy then it will be fairly simple to do this. Just go to Caddy and add all the domain names pointing to the IP address of the VM you are hosting on and to the right port ;)
Storage
At this moment Ente uses MinIO S3 block storage for storing all the media. Now, this might change in the future but that is what it is today. The reason I say his is because MinIO stopped being open source since it Archived it's repository in 2026. Now, Ente offers you the option to store everything in an external MinIO bucket if you have one running or you can create a new one if you don't have a MinIO S3 pool running. I guess most people don't have an object storage running at this moment so we will walk you through setting one up.
# Copy this file to museum.yaml in the same directory in which this file is present

# This section is meant for configuration of database.
# Museum uses these values and credentials for connecting
# to the database.
# Set a strong password and if using PostgreSQL Docker container
# provided in Docker Compose file, ensure db.password is same
# as POSTGRES_PASSWORD
# Similarly ensure db.user and db.name are same as POSTGRES_USER and
# POSTGRES_DB respectively
db:
    host: postgres
    port: 5432
    name: ente_db
    user: pguser
    password: jSZxfR5+WSp4oOhHFev+jzs1Dg+b


# This section is for configuring storage buckets. Omit this section if
# you only intend to use Ente Auth
s3:
    # Change this to false if enabling SSL
    are_local_buckets: true
    # Only path-style URL works if disabling are_local_buckets with MinIO
    use_path_style_urls: true
    b2-eu-cen:
      # Uncomment the below configuration to override the top-level configuration
      # are_local_buckets: true
      # use_path_style_urls: true
      key: <key>
      secret: <secret>
      endpoint: localhost:3200
      region: eu-central-2
      bucket: b2-eu-cen
    wasabi-eu-central-2-v3:
      # are_local_buckets: true
      # use_path_style_urls: true
      key: <key>
      secret: <secret>
      endpoint: localhost:3200
      region: eu-central-2
      bucket: wasabi-eu-central-2-v3
      compliance: false
    scw-eu-fr-v3:
      # are_local_buckets: true
      # use_path_style_urls: true
      key: <key>
      secret: <secret>
      endpoint: localhost:3200
      region: eu-central-2
      bucket: scw-eu-fr-v3

# Specify the base endpoints for various web apps
apps:
    # If you're running a self hosted instance and wish to serve public links,
    # set this to the URL where your albums web app is running.
    public-albums: https://albums.rfeyn.org
    # If you're running a self hosted instance and wish to serve public links
    # for locker, set this to the URL where your share web app is running.
    public-locker: https://locker.rfeyn.org
    # If you're running a self hosted instance and wish to serve Ente Paste,
    # set this to the URL where your paste web app is running.
    public-paste: https://public.rfeyn.org
    # If you're running a self hosted instance and wish to serve public memory
    # shares, set this to the URL where your memories web app is running.
    public-memories: https://memories.rfeyn.org
    cast: https://cast.rfeyn.org
    embed-albums: https://embed.rfeyn.org
    # Set this to the URL where your accounts web app is running, primarily used for
    # passkey based 2FA.
    accounts: https://accounts.rfeyn.org
    # Set this to the URL where your legacy recovery web app is running.
    legacy: https://legacy.rfeyn.org


# Key used for encrypting customer emails before storing them in DB
#
# To make it easy to get started, some randomly generated (but fixed) values are
# provided here. But if you're really going to be using museum, please generate
# new keys. You can use `go run tools/gen-random-keys/main.go` for that.
#
# Replace values in key and JWT for security
key:
      encryption: d4DU5WiP7LafNtVU4YXmDq0PQ5mpT6cZuox84yE4W9E=
      hash: W+fyKVK2tBqkm5HZnMp6eITMYXyAgLFyhDkSnuEz7UmaDayD/SBKZf+1iUlKEuOy3bRfM2PBuByeO2UKhZsOGg==

jwt:
      secret: 9DiDZPPKId57tXbtPnCGEl_Tuc0LbNMkpv32DPTA8tQ=
make sure you change the minio api endpoint such that people can upload to your instance without being connected to your vpn if you want to have a public instance. You can choose to do mino.example.org
MINIO_ROOT_USER=minio-user-PwZZDZ4b
MINIO_ROOT_PASSWORD=yRpTHbJRKP0kAb1mBIkMfirDQTaZ
# Service: Web
# Replace this with the API endpoint for Museum.
ENTE_API_ORIGIN=http://localhost:8080
4. Now, what do they request from you here
5. You should consider generating values for JWT and encryption keys for emails if you intend to use for long-term needs. You can do by running the following command inside /ente/server folder, assuming you cloned the repository to the ente folder.
6. We will now configure the museum.yaml file even though the example file is named as example.yaml which can be found in the ente/server/config folder. Just nano into it and it should give you this
5. So what do we need to adjust in the museum.yaml file ? Well we need to make sure that we provide the correct URL's for the different apps that ente is providing. My recommendation today is to use one domain name and in front of it place the name of the app.
In order to run the cluster, you will have to provide environment variable values. Copy the configuration files for modification by the following command inside server/config directory of the repository. This allows you to modify configuration without having to face hassle while pulling in latest changes
# Copy this file to museum.yaml in the same directory in which this file is present

# This section is meant for configuration of database.
# Museum uses these values and credentials for connecting
# to the database.
# Set a strong password and if using PostgreSQL Docker container
# provided in Docker Compose file, ensure db.password is same
# as POSTGRES_PASSWORD
# Similarly ensure db.user and db.name are same as POSTGRES_USER and
# POSTGRES_DB respectively
db:
    host: postgres
    port: 5432
    name: ente_db
    user: pguser
    password: <password>

# This section is for configuring storage buckets. Omit this section if
# you only intend to use Ente Auth
s3:
    # Change this to false if enabling SSL
    are_local_buckets: true
    # Only path-style URL works if disabling are_local_buckets with MinIO
    use_path_style_urls: true
    b2-eu-cen:
      # Uncomment the below configuration to override the top-level configuration
      # are_local_buckets: true
      # use_path_style_urls: true
      key: <key>
      secret: <secret>
      endpoint: localhost:3200
      region: eu-central-2
      bucket: b2-eu-cen
    wasabi-eu-central-2-v3:
      # are_local_buckets: true
      # use_path_style_urls: true
      key: <key>
      secret: <secret>
      endpoint: localhost:3200
      region: eu-central-2
      bucket: wasabi-eu-central-2-v3
      compliance: false
    scw-eu-fr-v3:
      # are_local_buckets: true
      # use_path_style_urls: true
      key: <key>
      secret: <secret>
      endpoint: localhost:3200
      region: eu-central-2
      bucket: scw-eu-fr-v3

# Specify the base endpoints for various web apps
apps:
    # If you're running a self hosted instance and wish to serve public links,
    # set this to the URL where your albums web app is running.
    public-albums: https://albums.rfeyn.org
    # If you're running a self hosted instance and wish to serve public links
    # for locker, set this to the URL where your share web app is running.
    public-locker: https://locker.rfeyn.org
    # If you're running a self hosted instance and wish to serve Ente Paste,
    # set this to the URL where your paste web app is running.
    public-paste: https://paste.rfeyn.org
    # If you're running a self hosted instance and wish to serve public memory
    # shares, set this to the URL where your memories web app is running.
    public-memories: https://memories.rfeyn.org
    cast: https://cast.rfeyn.org
    embed-albums: https://embed.rfeyn.org
    # Set this to the URL where your accounts web app is running, primarily used for
    # passkey based 2FA.
    accounts: https://accounts.rfeyn.org
    # Set this to the URL where your legacy recovery web app is running.
    legacy: https://legacy.rfeyn.org


# Key used for encrypting customer emails before storing them in DB
#
# To make it easy to get started, some randomly generated (but fixed) values are
# provided here. But if you're really going to be using museum, please generate
# new keys. You can use `go run tools/gen-random-keys/main.go` for that.
#
# Replace values in key and JWT for security
key:
    encryption: yvmG/RnzKrbCb9L3mgsmoxXr9H7i2Z4qlbT0mL3ln4w=
    hash: KXYiG07wC7GIgvCSdg+WmyWdXDAn6XKYJtp/wkEU7x573+byBRAYtpTP0wwvi8i/4l37uicX1dVTUzwH3sLZyw==
# JWT secrets
jwt:
    secret: i2DecQmfGreG6q1vBj5tCokhlN41gcfS2cjOs9Po-u8=
services:
museum:
build:
context: ..
ports:
- 8080:8080 # Museum/API
depends_on:
postgres:
condition: service_healthy
env_file:
- .env
volumes:
- ./museum.yaml:/museum.yaml:ro
- ./data:/data:ro
# Resolve "localhost:3200" in the museum container to the minio container.
socat:
image: alpine/socat
network_mode: service:museum
depends_on: [museum]
command: "TCP-LISTEN:3200,fork,reuseaddr TCP:minio:3200"
postgres:
image: postgres:15-trixie
env_file:
- .env
# Wait for postgres to accept connections before starting museum.
healthcheck:
test: pg_isready -q -d ${POSTGRES_DB} -U ${POSTGRES_USER}
start_period: 30s
start_interval: 1s
volumes:
- postgres-data:/var/lib/postgresql/data
minio:
image: minio/minio
ports:
- 3200:3200 # MinIO API
# - 3201:3201 # MinIO Console (uncomment to access externally)
env_file:
- .env
command: server /data --address ":3200" --console-address ":3201"
volumes:
- minio-data:/data
post_start:
- command: |
sh -c '
#!/bin/sh
while ! mc alias set h0 http://minio:3200 ${MINIO_ROOT_USER} ${MINIO_ROOT_PASSWORD} 2>/dev/null
do
echo "Waiting for minio..."
sleep 0.5
done
cd /data
mc mb -p b2-eu-cen
mc mb -p wasabi-eu-central-2-v3
mc mb -p scw-eu-fr-v3
'
ente-web:
build:
context: ../..
dockerfile: web/Dockerfile
ports:
ports:
- 3000:3000 # Photos web app
- 3001:3001 # Accounts
- 3002:3002 # Public albums
- 3003:3003 # Auth
- 3004:3004 # Cast
- 3005:3005 # Share
- 3006:3006 # Embed
- 3008:3008
- 3009:3009
- 3010:3010 # Memories
# Modify these values to your custom subdomains, if using any
environment:
- NODE_ENV=development
env_file:
- .env
volumes:
postgres-data:
minio-data:2. Ente Clients
Ente can be accessed on various devices and operating systems. But you know we promote open source technology here so we encourage installing either on open source operating systems
Phone/Tablet

Desktop

TV
At this moment Ente does not have an official TV application. However, you can simply open up a web browser on your TV and then cast an album to the TV via the web browser. Now, this use case is somewhat limited since it is only a slide show. Therefore, we recommend to plug in an HDMI cable with a laptop or you can make a public link of your album and copy paste that in your TV's web browser. If you have however an open source TV box such as a plasma big screen box then Ente will be available in the Linux store.
Smartwatch
At this moment there is no smart watch Ente App available
Source: Flathub
3. Public Albums
Source: Custom Domains
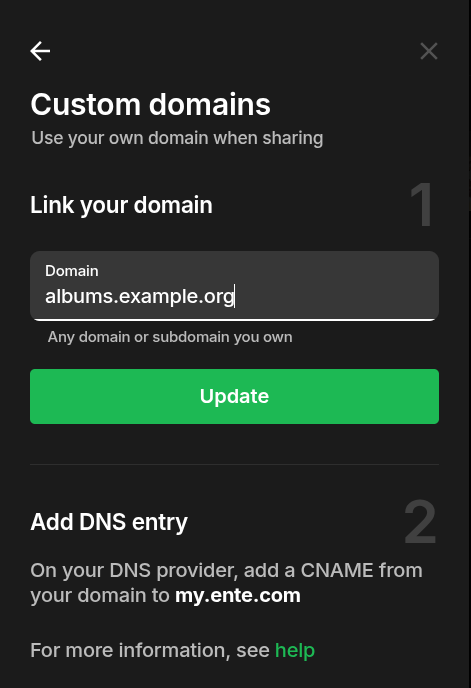
Ente also provides the possibility to share media with people that are not on Ente yet. This means that you can share single pictures, videos, memories but also whole albums. However, if you self host you need to make sure that you setup you connect your public albums domain name to your Ente server. Then a user on your Ente server will get the correct shared albums link when they want to share a public album
 Custom Domain
- Open up your admin Ente account on your desktop or in the webbrowser. At this moment it does not seem to work on the phone app.
- Then go to Settings > Preferences > Custom Domains
- Then fill in your public albums domain.
- You most likely already setup the public albums DNS and Reverse proxy settings but if not the standard port is 3002 and the public link is albums.yourdomain.org.
- Then restart your Ente app on all your devices s.t it synchronizes with your albums domain.
Create a Public Album
- Go to an Album
- Hit the sharing icon in the top right corner
- Then select create public link
- Then select Manage link to adjust the permissions of this public link to your wishes
8. Streamable Videos
Streamable videos van be activated inside the desktop application for videos bigger than 1 minute in size. You should do this s.t your laptop/pc can do the heavy lifting instead of your phone to create streamable videos. In this way, a users does not need to download the whole file to their device but can start watching instantaneously via streaming !
 1. Enter you Ente Desktop application
2. Go to Hamburger menu -> Preferences -> Toggle on streamable videos.
3. Then underneath it as you can see it will how how much of your videos have been processed on your laptop.
4. Perfect! Now you do need to make sure that your desktop app is running in the background to create the streamable videos for you.
9. Migrate from MinIO to Open source S3 Bucket
Source: MinIO -> Garage
Source: MinIO -> General (RustFS) recommended
I would recommend to use RustFS instead of MinIO. I still need to make a tutorial on this but it is set in my ToDo list !!
10. Contacts
The beautiful things about Ente compared to other self hosted personal media applications is that it also offers you a social graph. That means you and friends and family of yours can also comment, like and share your albums and photos. It basically becomes a private social media where each albums is only shared with people you want it to be shared with or for who it is relevant.
However, even though you can share an album publicly with people via public links the only official contacts you can have are ones that are on the same Ente instance as you. Hence, it is not federated nor a decentralized application. All is depended on a single instance. If your instance goes down then so do all of your photos and videos.
- This also means that social graphs only work for people subscribed to the same instance
- Hence, if you want to add a contact or want to share an album with a friend of yours they need to be subscribed to the same instance.
- This is radically different from standard social graphs where everyone sits on the same instance e.g Instagram, Facebook, Reddit and others
Now, most likely at this moment the default Ente instance (owned by the Ente organization) holds the most amount of users. Therefore, Ente does run the risk of becoming a centralized application again if the network effect of being all on the same instance will win from self hosted instances. At this moment there is no roadmap plan for federation or anything decentralized of that matter. Hopefully, in the future we will see some progress in this department but for now the only way to share albums, comments and likes is only via public links or if your friend is on the same instance.
How to add a contact
Ente Photos doesn’t have a separate contacts list or a way to add contacts independently. A person becomes available as a contact only when you share an album with them, using their Ente account email address. So if you want to add Anna as a new contact then you will first share an Album with Anna or Anna shares an album with you.
1. Go to your Album
2. Click on the share button on he top right corner
3. Add viewer, collaborator or admin
4. Then enter the email address of Anna
5. Then go to your contact list where Anna will appear as a contact.
6. Then the final step is to associate the contact email address of Anna with the person Anna.
7. From now on you can see Anna's comments, likes and can easily share albums with her
11. Archiving Albums
Archiving an albums in Ente Photos removes it from your home timeline and memories, but the photos will still appear in the album and search results. This allows you to declutter your main view without losing access to the content in the album.
This can handy for instance if a friend of your shared an album with you that is relevant for a specific amount of time but that you don't want to show up in your main time line after the event. For instance if one of your friends does a marriage proposal they could share it with you to let you follow your friends experience. After that you can Archive the albums s.t you can still find it if you want to but it does not show up in your memories and home timeline ;)
- To do this go to an album
- Click on the three dots .. on the top right corner
- Select archive a
4. Video Editing and Thumbnails
Ente is not a video editing application, at least not yet, since you will never know of course. Already, if Ente would allow to add a thumbnail to a video would be great. Then you can simply make a screenshot of the video, add some text and add it. This makes searching for a video not only easier but it also simply looks nice. But for now it can only trim or crop the video. For a more advanced way of editing a video i.e with text, thumbnails, multiple videos in a row etcetera we suggest the following open source applications
Phone/Table

Desktop
To my understanding the thumbnail that Ente generates for you is the first seconds of your video. Thus, we can place the thumbnail as the first seconds of your video. One of the great desktop video editing programs for this is called Kdenlive. The steps are pretty simple if you know how to use Kdenlive already. If not check our guide on Kdenlive
- Make thumbnail
- Enter Kdenlive and add is as a picture of the first few seconds of your video
- Render your video
Now, I don't understand how Kdenlive generates a thumbnail but it is not the first seconds of the video. Now, you can still add a thumbnail to it as well by using the command line. On linux you can use the following command to make this happen
ffmpeg -i videofile.mp4 -i thumbnail.png -map 0 -map 1 -c copy -disposition:v:1 attached_pic newtitlewiththumbnail.mp4This will create a new file with the thumbnail attached to your video file.
12. Ente Legacy
Life is unpredictable. Legacy helps someone you trust recover your Ente account if you lose access, are incapacitated, or are no longer around.
There are two Legacy options in Ente Locker:
- Trusted contacts: Choose another Ente user who can recover your account after a waiting period.
- Legacy Kits: Create 3 physical recovery sheets. Any 2 sheets can start account recovery in a browser, and the helper does not need an Ente account.
Both options are account-level recovery tools. They are not item sharing, collection sharing, or direct login.
13. Ente vs Immich vs Photoprism
Source: Techfuelhq